I looked around on your posts Wayne, but didn't see, might have overlooked.
Was just curious - what year model is your Skyhawk?


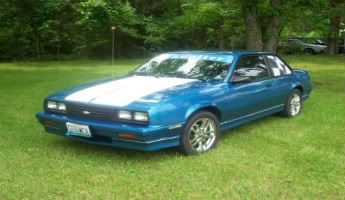
Orlen--it's a 1985
John--I don't know what's going on, but I can't get pics to work right now.
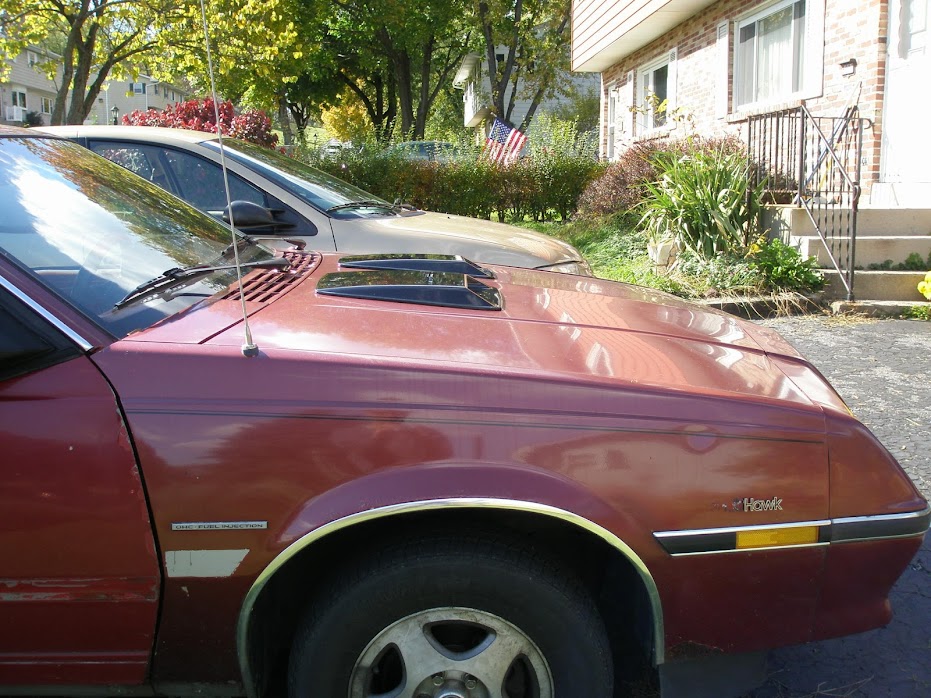
I didn't install the hood scoops yet, I just laid them on the hood where I want them to be. I moved them around the hood and decided that to the rear and center were the best.
What I really was looking for was a scoop like a 1966 GTO.
but I figured with the hood having a seam down the middle, I wouldn't be able to do a scoop like that too easily. I'm happy with what I found though. It's a Pilot Automotive CZ-2888, I got it at Autozone. They're low profile, maybe an inch high.
I thought of portals like a "normal" Buick, but I didn't really want to be normal with this car. The Buick eight cylinder cars had four portals, the six cylinder cars had three; a four cylinder never had portals, so I was considering two, but figured it would look dumb and nobody would get the joke.
I love my new wheel. A few years ago when I decided to get the car I had in high school, and found this one, I was going to stay stock, especially since I found one with the cool rims and steering wheel. Then I thought about that some more and part of the reason I wanted my high school car back was unfinished business. I always wanted to pimp my ride. I always wanted a 76 Trans Am too, and did have one for a while, but it would be too expensive to do anything with, and the Hawk would be cheaper to do, fun to drive, and a great way for me to finally learn how to work on cars more than change my oil.
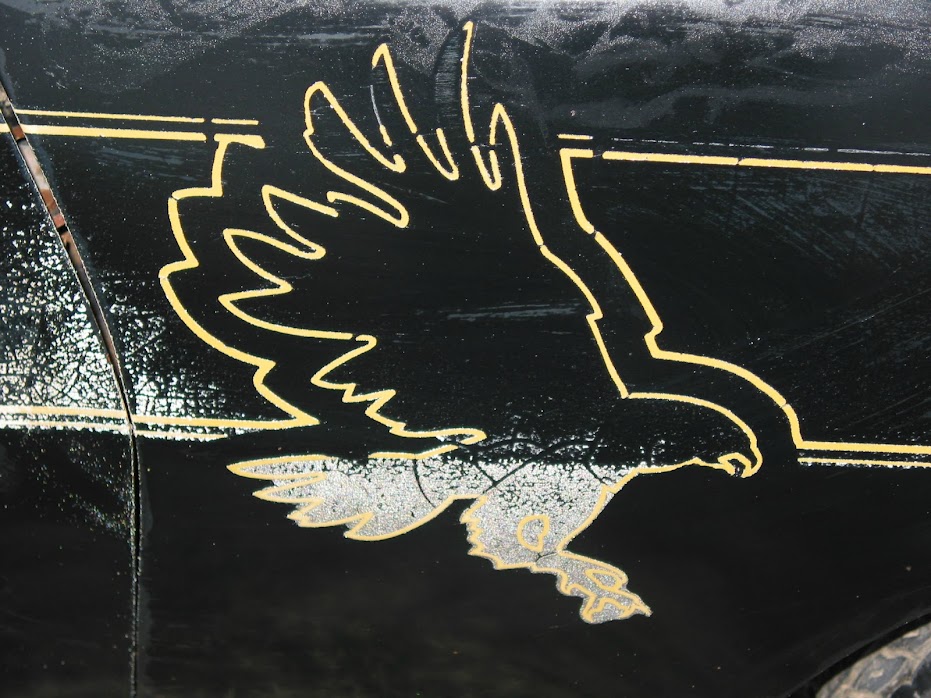
The Nighthawks were black cars with gold details, gold rims, gold pinstripes which outlined a reflective tape that was black in the day and showed nicely in the night, and a pinstriped hawk like you see in my pics.
The Roadhawk was a 1979 model in silver with charcoal striping. The Spirit Edition was silver with some orange striping. There was also a DAE Skyhawk in red with black graphics. I think DAE stood for Designer Accent Edition.
you can see some pics here:
http://forums.aaca.org/f115/1977-buick-skyhawk-nighthawk-258856-2.html
The white one you saw was yet another edition, but I don't remember the name. It had white seats with something sewn in the headrest.
As for where I found the Nighthawk graphics, I'm not sure what you thought you were looking at in my pics, so if I go into "well duh" territory I'm sorry.
I used painters tape to make the blue stripe since I wanted to plan on what exactly I want the body shop to do when I get it painted, plus show them something so they understand what I want. I hand wrote the word "Nighthawk" just for fun. The bird I got from when a real Nighthawk showed up on ebay a few years ago. I think it was 2009 and it was located in Kansas. Some guy had it in a barn for years, so it didn't look horrible but needed a lot of work. Lucky the graphics were in good shape. I emailed him and said I wasn't able to buy the car, but asked if he could take some close-up pics of the hawks since there weren't any good pics on the internet of them. He was nice enough to do that for me and I've had them since. When I can get the darn things to show up in a post, Ill put them here.
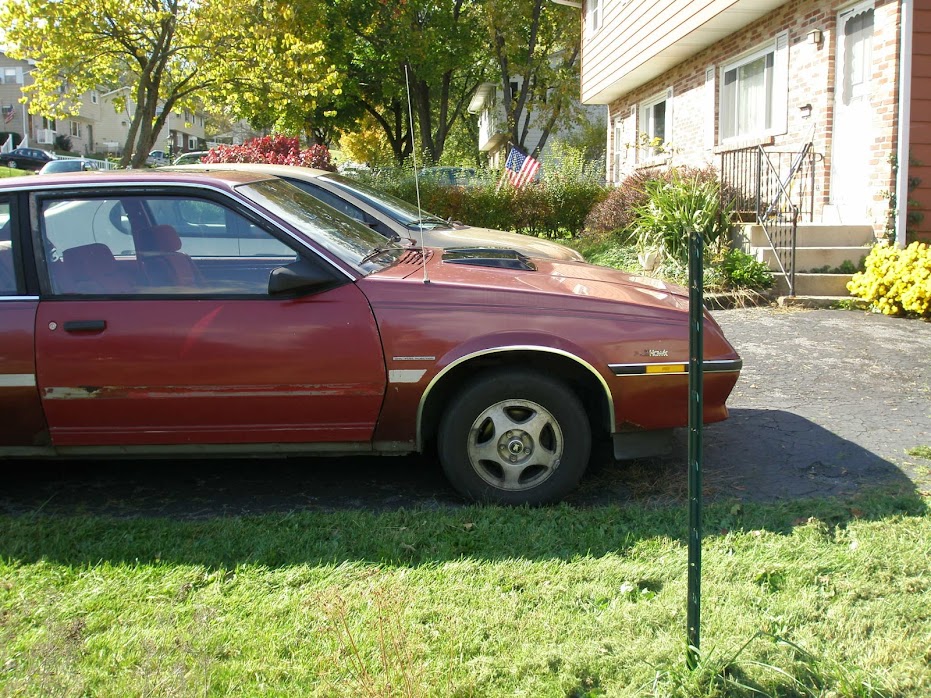
I then printed out the pic and cut it out, and taped it on the car with my painters tape so I could decide placement. Originally I was going to put the fender vent lower on the car behind the wheel well, but since the body has a curve there and since the ground effects I'll be adding come up the fender a little, I would not be able to put the vent there. So now I decided on moving the vent higher on the fender, and having a wider stripe that matches up with the vent, and I moved the hawk behind the door.
Since there was only 9,562 Limiteds were made in all 3 body styles, I'd say you have a very rare example there!!
J
Getting the job done, hopefully back together by next Sunday night.

Rebuilt fuel injector, new fan switch, new hoses, new trans cooling lines, new EGR Valve, new PCV valve filter, new air cleaner temperature sensor, new air filter, new catalytic converter...runs real nice now:

The left side came out easier:

up off all four:

wow - color takes me down memory lane to my 86 Skyhawk. I had the OHV in mine though. Same color and rims. I think mine was a limited.

OH GOD PLEASE TELL ME THE STICK ON PEP BOYS SCOOPS ARE A JOKE?!????
Corey Dorman wrote:OH GOD PLEASE TELL ME THE STICK ON PEP BOYS SCOOPS ARE A JOKE?!????
I've been thinking that too. I pulled them off on a custom s10 xtreme and painted them to match but they do not flow well with old box style cars.

On the inside my car looks like a fighter jet.
Those scoops are not on the car yet, I just placed them on the hood to decide if that's what I was going to do.
I'm still making final decisions on some areas of how I want the car to look.
don't worry though, I managed to pick up a turbo hood and will be using that instead.
IMO , Wayne, feel free to style up your "Hawk any way that pleases YOUR eye!
Everyone certainly is entitled to their opinion and to their way to express that. Critique & Critisism are just a part of being unique. This is YOUR J-Body, however and please don't dress or strip it in any way to please anyone but yourself my friend!
We can never please everyone all at the same time anyway, so please keep that little tidbit handy as you make progress on your J

Obviously you can tell I haven't kept mine as stock, and who knows......I may just drop a scoop or 2 on my own just to be a little left field of the status quo....LoL Come to think of it, I don't think we have much to representative the examples of the Advance Auto dolled up fun J's that the young folks played with back in the 80's or 90's!!
.
Scoops look good! It is your car and cars are not one size fits all. Like Rob says though, color match them when you paint the car and see how they flow with the Hawk body lines.


I know not everyone is gonna like what I do to the car, but I don't worry about it. If I didn't score the turbo hood, those scoops woudl've been on there and given the paint job with the rest of the car.
I think I'm about a month away from the painting, so really just making last minute decisions on stuff that's been swirling in my head for years.
I've even decided to ditch the fender vent and get the stripe all the way to the side of the nose; and I will now be going with the 80s style Hawk on the side.
It's not that I don't like the look of the scoops or the fender vent, and I think it will look fine when painted; but like when making a decision about a tattoo, or to buy a house, it's a long-term result and I don't want to drive thinking I should've done something else.
For what its worth, I didn't like the look of the hood scoops because I think they are too short in length and look stubby and not sold on the placement on the hood in the photo, maybe pushed a bit more forward based on their short length. I had a similar pair, but were mine were much longer in length making them look low and swoopy and pushed the openings more toward the front 1/4 of the hood and ran a an inch or two from the back of the hood. I thought they looked great and was really considering using them because they majorly amped up the sportiness of the flat car hood and were reminiscent of scoops put on the early 70's Trans Am hoods in which the openings were nearly flush with the front of the hood, but I wound up with the factory GT scooped hood which took the plastic scoop option off the table. So I think if things look good go with them, if they seem hoaky, stay away from them. And while I respect everyone's different tastes and opinions, it seems all too often that guys will do something to their cars to be different without looking at the big picture of how it really comes across, that's why I took pictures of my car with them on and off and at different angles and looked at them over and over and over.
Also, Wayne I read how you explain how easy it is to take doors off a j body because I wasn't sure I should pull my passenger door off to address rust in the door bottom and make it easier to paint the door jams two tone when I change my factory paint scheme. Well.....I had to cut the door pins because I couldn't get the pins to budge. Even after the door was off, I still have the head of the bottom pin still stick in the hinge I have to get it out of the hole without bending the hinge wider or narrower. So with that in mind, I sure hope you are right about them being not hard to put back on. I am not looking forward to that since I don't have a good strong, mechanically inclined helper readily available to assist me. Dad is a great helper with problem solving and light duty tasks, but his back is too weak to help with that task and his body too beat up to be as limber as needed to get into the tight hinge area.
Here is my $100K question, how did you get the door check springs back on and when did you do that, before or after the door was hung back on the car? I am dreading trying to put them back on thinking that seems like an almost impossible task considering how nearly totally collapsed they are when the door is fully opened so you can access them.
You mentioned painting your car, are you stripping all the way down to bare metal? I used 2 gallon of stripper and about 2 packs of coarse steel wool and 2 sets of heavy rubber gloves stripping my car. It cost about $80 to do to. I used a 5" sanding disk in a drill to remove all the old body putty as recommended by the reference material I have read. This allowed me to use my Harbor Freight $100 stud gun to minimize the dents under the old putty. I have had nothing but great results and luck with this cheap stud gun so far and have put in about 100 studs on the Sunbird. I also bought a Stud Lever off ebay for $42 and a $12 body hammer from Advance Auto. Those 3 items work super slick and allow a first time metal worker and stud gun user like myself get great satisfactory results which is going to greatly reduce the amount of putty I have to put on the car. I have watched the Evercoat.com training videos on youtube and Donnie Smiths Butler College videos too as reference for how to do the body work right the first time. I too hope to be painting my car by labor day. I have to get it painted in this warm weather so I can finish the car this fall or the car will have to sit and wait until late spring to take advantage of the warm painting weather.
Will you be painting the car yourself or having a shop do the work? Are you going to be using base coat clear coat and buff the paint out yourself or have shop do that too? My dad just did that for a guy on a 68 Firebird and he told me that he seems to average 1 square foot an hour to wet sand the area, then buff it to the desire shine. So once I have my car painted, that's the next labor of love or back breaking work I have to look forward to.
I really like the wheels on your Hawk. There is a scrap metal guy I occasionally go to who has (I think what is) a Hawk front clip sitting up near his trailor in beige. I thought about buying it for the extra first gen front fenders for spares for my Sunbird, but now don't need it because of the GT parts I parted out. If you need something off that front clip sheet metal, or interested in the entire thing I can check on it for you, but imagine that shipping would pretty much shoot down that option. It just cost $44 to ship my quarter glass a 2 states away. The front fenders and grill assembly is all he has left since he junked the rest of the car years ago.
I also like your finned valve cover. It looks like something I would paint crinkle coat black, then sand the paint off the tops of the fins and lettering kinda like the late 70's Vettes came with. It would also look good if you brightened / polished the entire valve cover and painted the area between the fins body color like the hot rodders did back in the 60's to their Cal Custom finned valve covers.
Keep the good work and updates since I need the inspiration as motivation to get mine painted. My dad constantly is reminding me that if the car doesn't get completed and on the road.....all the money and work spent on it was pretty much for nothin'!
Bill--
Scoops--I've done much of the same in looking at those hood scoops. Toward the back and middle of the hood was the best looking placement for them IMO.
Doors--the pin popper tool from Amazon works great for getting those pins out. Just search GM Door Pin Popper.
As for what to do now that you've cut them...maybe get this tool and you can get what's left of the pin through anyway. Maybe a good long awl type tool will be strong enough to get through. It will be hard to get through now because there's no lubrication on what is going through the hole. I always WD40 the pins prior to popping them out. You may just have to remove the upper hinge, you can get to the inner bolt by reaching up from the hole you found to get the inner bolt on your lower hinge. Won't be easy, but could be your last option. Another thing you need to consider when getting the pin out is that the door will put weight on the pin against the hinge, so you either need to have someone hold up the rear side of the door to keep it from sagging, or use a floor jack for this purpose.
About the $100K question, I'll answer that for free even though I'm not independently wealthy...there's a tool for that, but that's the hard way. The easy way is to ignore the springs, they stay with the bottom hinge when you pull the door off. I wouldn't want to try and put them back in either, and if they didn't stay with the hinge, I would just go to a body shop and have them do it. I figure about 1/2 hour labor is still better than paying someone to do the entire door.
Painting--I'm not doing the paint, I'm taking it somewhere to have it done. I have no skills in that department, and my mechanical skills aren't very good either, but I'm learning a lot with this car; that's the fun part/point of me owing this Hawk.
Scrap metal guy--quarter panels, wheel wells and nose are all I need to have a complete set of spare body panels/parts/glass. So if that guy has the nose, and it's the same as my car (82-85, maybe 86), I would want to buy the nose. I could drive out and pick it up, or Hershey and the Troeggs Brewery are half-way between us if you'd want to meet there.
Wayne I was able to get the door off and figure I will just drill out the pin head or maybe tack weld a bar to it and twist it loose so that's not a major a pressing issue, but was wondering about the check springs. I am debating whether I should try to put them in after the door is on, or try to put the lower hinge together first and put them in before putting the door on the way you did yours. I am now thinking if I put the hinge together first, then paint the jams and sides and bottom of the door, I might be less likely to scratch up the hinge jam. How did you get into the lower front hinge bolt, did you go through the front fender well?
My brother said the garage he used to work at would collapse the spring in a vise, then use wire to keep it collapsed, install the spring and cut the wire. I watched a guy on youtube do the same thing, but he used 3 zip strips on a truck. The springs are collapsed so much when the door is open, I am not sure that those methods will work and also concerned about the lack of room to work in when the door is back on. A body shop is a great suggestion as a back up plan. My concern with that option that they might scratch up my newly painted door jam area and hinges which would just cause a major problem after all the work I had done to paint the car. That's another reason I prefer to do my own work. I always wind up forgiving myself at some point, but might not be so forgiving or understanding when paying a professional.
I will check on the that front end next time in that area and try to remember my camera to take some picts of it. The guy was being hassled by the township about the aesthetics of his property, so he was starting to clear things out this winter. I haven't been back since Feb. I hope it didn't get scrapped. We might be able to find a common car event or area of interest to meet up if things work out and that's a detail to resolve. I try not to miss the Hershey antique car swap meet, but usually go on Wednesdays. I also usually hit up Carlisle in the spring and fall on Saturdays, so maybe something like that, though my college buddy and I could be up for a Brewery meeting too. We will cross that bridge when we get there, but I will definitely check on that clip for you.
Any idea what your color change will cost? I have no idea what the going rate on is a squirt job since I am DIY guy and would rather spend my money on the tools and materials to try and learn a new skill, rather than pay someone else. But, I completely understand how one would opt to pay for a paint job since it is an expensive, finicky process, with steep learning curve if not shepherded along by an experienced knowledgable person. I have had enough limited experiences to be fearless....and will probably have dear ol' dad on hand to help ensure success.
Bill your hinge issue is unusual. Normally those brass bushings are so worn out that the pins pull out by hand.
Before I bought the tool, I tried by hand and never had any success.
As for the spring, the way I get the lower hinge out (remove inner & outer bolts), the spring just stays with the hinge on the door.
The lower hinge bolt--I'm guessing you mean the outer one since the inner one is easy behind the kick panel...I used an 11mm open/box wrench and some patience. I've become quite good at it. It gets a little tough around the lower hinge pin because the head will be hard to get to, but it can be done. Maybe an offset (with a really small offset) wrench would help in that area. I do it all from behind the door. There are times I have to close the door more and times I have to open the door more, but it gets done eventually.
Forgot to answer the question about how much to get the Hawk painted...
no idea at all; but I know someone who had their S-10 painted for $2000, and that included some body work. I figure mine will be $1500 - $2000 depending on a few things.
Though $1500 initially seems like a tall number, I am guessing I will have about $700-$900 in ALL the supplies needed to paint my car which includes sand paper, putty, paint, tape, and the polishing too. So having someone else take care of the work, provided they do a satisfactory job, is a very reasonable price.
I am looking forward to the end result since things are looking great so far!
I have a buddy at work . His parents have a run of the mill 2nd gen sedan with the clear coat blowing in the wind. They took it to one of their local body shops that do mostly insurance paid repairs. The shop quoted them $3K for removal of the clearcoat and proper respray. Needless to say ....the clearcoat is still blowin'!!
IMO when it comes to body & paint the sky is the limit. I guess that is why I shun away from a lot of car shows. All it takes is a rich SOB and open pockets to buy whatever and pour resources into it. Set something like that next to any ordinary Joe and there is, of course, no comparison. I'm sure you have seen the like - cars with paint jobs worth about the amount of your house? " Yeah" they say "I've got 5k in the engine alone, and the roughly 10K in the body work" , after which they try to make you feel their pain of having all these problems getting various shops and people to get the quality work done right. There are folks in our area that have not 1 but several cars they set out at such events. Now don't get me wrong - I and very happy for their fortunes, but at my age I just appreciate the average Joes and the examples of what they are able to accomplish with their abilities and budgets. How hard is it to spend money?
Thankfully, the vast majority of such people blow past folks like ourselves and our simple examples of mostly basic GM transportation. I remember when this site was down not too long ago due to a busted server there were several characters posting nasty comments about the J-Body forum and their ghetto Chevys.
Here is where average folks like ourselves figure out as simple solutions to as many as all kinds of problems. Body work is really as down to earth as it gets too boot. Sure , the more money you want to spend, the better the outcome is going to look (Usually). If you have a $10k Garage full of great body equipment I say Bravo, but if all you have is some basic tools and a rivet gun - then just do the best with what you have. Chances are what you finish up with will look darn better than what you started with. If it doesn't? I'll wager a bet you've learned a thing or 2 in the process. There is always another year and another time to try again.
Most important thing is YOUR J is not ground up in little pieces on a big ship headed overseas, and you have something that you are enjoying. Priceless!!
.
Basically, last year I made a few decisions that would make it possible for me to get the $1500-$2000 together for the paint job/body work; plus spend a few hundred on other parts I really needed to keep the car going as a daily driver for the next four to five years.
My wife's bought and paid for truck was just not a good idea to keep, and it was still worth money, so we sold it, paid off a good chunk of debt and did a few other things.
Getting rid of that debt was what made it possible to save the money for the Hawk. My wife got the last two new vehicles while I have gone "backwards" in daily drivers. I was to have my dream of an S2000 by now. I made a deal with her that she gets a Mazda 3, and I get to deal with the Hawk.
That is the reason I'm going to the body shop, I have some rust issues that need attention NOW and I'd rather do what I need to do for the long term health of the car.
I was going to do stuff myself, but I can't wait for me.
Here is the right shock with the spring back in (hopefully it will stay put)
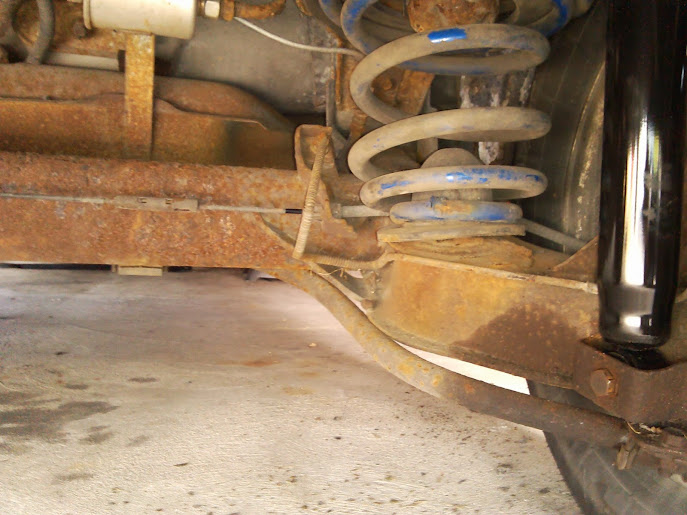
Here is the left:

Here is the power steering rack boot that decided it doesn't like me:

Sure that'll be OK?
I would at least seal the R/P boot with some of the permatex the right stuff.As for your rear axle.YOU need to sandblast the axle stupid clean and get all the rust off.As for the lower perches those can be very easily be repaired with the quick steel product and rebuild the flat area then redo the cone for the rubber boots.I see tons of surface rust as you live in area prone to well that condition.All you need is a good air compressor and the sandblasting kit those are not too expensive and play sand (the really fine grain sand) is what I use for very lowww cost.The compressor is your big item and get one with wheels and the sandblaster is nothing more than a plastic tank or metal that holds sand that has a hose to go to the air gun to spray(harbor freight is your bet on low cost) for that.Now that said your spring should sit tight bc the car weight holds it in place so no worries there.

by R/P boot, do you mean the power steering rack boot? I think that boot is too far gone for permatex, it fully snapped in two places.