WOW, thanks for sharing that Spike! I remembered seeing this one years and years ago. Back before I was a member here on J-Body and more recently before the EPA has started kicking up dust. I thoroughly enjoyed revisiting this, and it was extra special re-reading it after having "Rolled My Own" !!
Isn't it strange how life turns out sometimes.......
Amazing!!

....................................My "Bird seems to be missing those wide whitewalls they have on that Falcon.
.

I thought I'd just add this on to this thread.
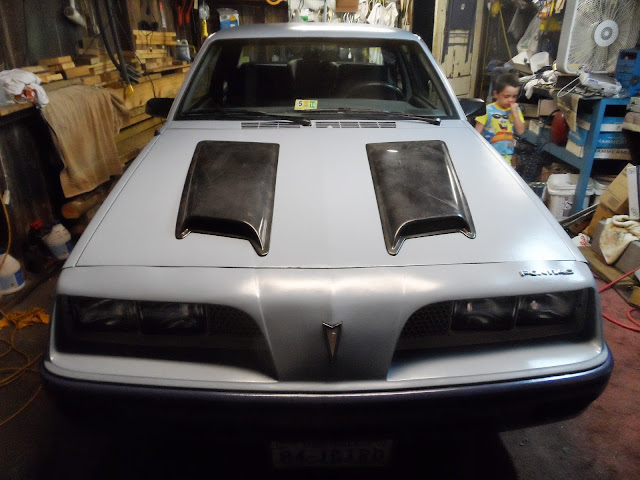
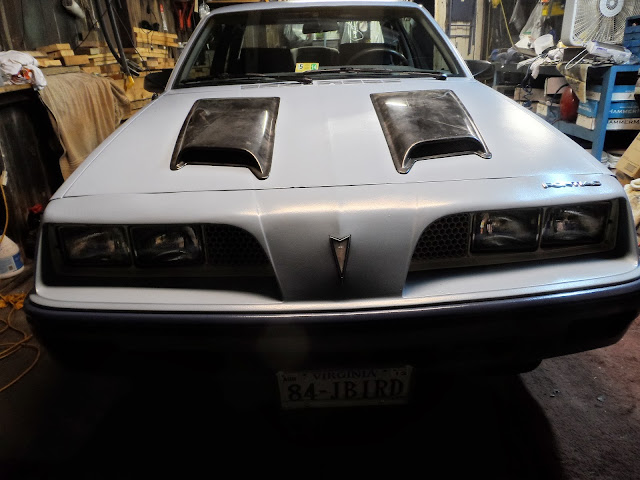
A BIG Wave and Hearty "Thank YOU" to Bill Stuck for fixing me up with these wonderful goodies for the 'Bird. Now I'm one of the fans of the 70's "Paint on Performance". I enjoy the flash, but I also want the reliability and non-complexity of the standard drivetrain (Not to mention the better fuel economy). Most models that have the extra bling come with bigger , more complex engines and heavy duty transmission.
Now while this is just a standard 84 horsepower Coupe , Bill has allowed me to dress it up some. Looks like I get the best of both worlds! My plans are to keep it simple. Scoops and Spoiler will be the same light blue matching the upper body. I probably will go with the matchine white in the Scoop Grills to match the "Grillettes" on the nose. To me - The Scoops are somewhat of passing similarity to the late model Grand Am Ram Air Hoods - which I really like!! Spoiler is a true blue factory original Pontiac J item - so I don't think it will excite Corey the Cavalier into Bold Caps....HeeHe!!


.
I like the longer scoops there.
For your trunk, just be sure to adjust the hinge so the trunk can handle the extra weight and remain open for you (something I still have to address on my car).
As that is a factory spoiler, keep in mind it might not bolt right up to your trunk as easy as you think. IF my memory of a previous thread somewhere is correct, the inside of the trunk lids with spoilers were a little different to accommodate the bolts.
"Paint on Performance" is exactly what I'm going for with mine!
"So my great investment here is about $60 for 2 gallons and 1 quart of paint, plus a few paint brushes and some 4" rollers. Beats the hell out of 4 Grand , and I don't have to worry about the clear coat drama ever again!!
" - Orlen
Orlen you should take great pride in the savings your DYI and thrifty ways have amounted to in your recent make over. I just bought 3 quarts of base coat paint, a gallon of clear coat, and all the reducers and activators, as well as a 16" long sanding board, can of guide coat and gallon of degreaser. Those contents, which fit into two casse of oil sized boxes cost me $375 and I still have to go and buy a gallon of body putty, glazing putty, and gallon of epoxy primer. I am very fortunate that I already have purchased the required sand papers at previous swap meets and the other body working tools so I do not have those expenses to endure. I think my two tone, base coat clear coat paint job is going to come in between $600-$800 when its all done, which includes the sand paper and buffing compounds to level the paint to better than factory smoothness. I wont be so bold as to say better than factory quality until the paint is shot because I know how finicky it is to shoot fine metallic paint to not have it turn out tiger stripped or other uneven appearance. With some luck, I hope to be shooting the door edges and jams in a few days. The car will be dark sapphire blue on the top of hood and deck lid and silver on the bottom 2/3, just like the paint scheme of the black and silver turbo car in your area. Which by the way, I copied and saved all those picts you posted of it for reference.
Here is another "throwback" appearance upgrade suggestion for you, cover your silver gauge bezels, lower switch bezels and shifter plate bezel with silver ""engine turned sticker vinyl "paper" reminiscent of the 64 & 65 GTO's and I think some Trans Ams. Those shifter bezels get boogered up over time, so rather than paint mine since mine are cracked and fixed, I am going to cover the repairs for an appearance upgrade, and yet use a historically based Pontiac styling appointment. Besides color and swirl size, there are two basic types of engine turning vinyl available, one which has a heavy rainbow effect and one much more subtle like the factory. I covered a sample part and unknowingly used the heavy rainbow effect kind and it looks really tacky, something a girl or teenager might think was cool. My buddy who letters signs, was kind enough to order a roll of the material I need with the assumption he can also make the unused portion of the roll as an available option to his future customers. Pays to be connected with the right people....but you know that first hand......LOL
Cant wait to see your car with the jbody "sport" appearance package painted and installed. It's going to make all the difference in the world.
Thanks for the kind words Bill.
There is no substitute for getting what you pay for, and definately you are going to have a head turner when you finish with the hard part you have before you
One plus side I can say to my roller special is fixing boo boos are very easy. I was working on one of the Grandsons bicycles - ( find old ones tossed in the trash and unwanted, bring them home for a second life) - was swapping a some good wheels in place of the badly rusted ones on one of his favorites. Anyways as soon as I turned my back the bike fell over and of course just had to produce a healthy horrible scratch on the drivers side door. Temporily forgetting about the bike for a bit I dug out the matching can of paint I'd used on the lower body and with a tiny painters brush carefully filled in the scratch. After a few minutes I had a hard time myself seeing where it was. Boy was I relieved!
Bill & Wayne - I really like that idea with the Engine Turned Bezels!! I happen to have some spare bezels I picked up as I got a chance and over time have wondered why I got them. I am one of these weird ones that likes to change out easy stuff from time to time of break the "sameness" of the appearance over time. Wheels & Steering Wheels are 2 esay ones to do . Now you have given me an idea with bezels too. Lots of things to keep the old man occupied!! I've seen so many men fix up a car- pour in so much money and time just to get bored with it and sell it. It is hard to sell something you fixed up just the way "you" like. Everyone wants to personalize someting to their taste.
As time goes by I hope to get all these ideas into reality -one day I hope to post up all kind of photos of the same car dressed up in all it's different "attire"!!
.
I finally got to read through this paint thread, Orlen and wanted to say "way to go"! Your Sunbird looks way better and its protected from the elements now with just a little work. I've got a '76 C20 pickup that I've been on the fence about painting and this has given me the confidence to paint it up and get it back on the road. Thanks for all the photos and play-by-play with your experience!

Is this the one Daryl?
Thought I'd post it up. Saved it years ago - I got more photos on my Hard Drive than Carter has Liver Pills!!

Looks like it'd be a great candidate. Really enjoyed working on the Pontiac. This method was so much easier than the Rattle Can job I did on the wagon. Spray paint tends to go everywhere....sometimes everywhere but where you want it to go. Sure beats letting something sit and deteriorate too. Those old 70's model trucks were like a tank!! (But simple to work on)
.
Yeppers, that's the one! It looked great for two years, and now that it sits outside rust has popped up EVERYWHERE on the thing. Its going to need metalwork, but for now we need to haul stuff and get a few more years out of it before a restoration. The rustoleum may work!
That's pretty normal for 70's GM sheet metal. I sand down the rust and apply a couple coats of the Rust Converter in a small White Plastic Bottle from WalMart - does a good job of slowing down the rust and makes a good coating to apply primer to. I think a bottle runs about $6. It has to be shaken up before use and foams like mad - you have to work with it to make sure to get the bubbles out before it dries. Water Based too. I learned to use one of my foam rollers to apply it , then I washed the roller out really good in warm water at the sink - dried it out, and re-used the roller for the primer coat the next day.
Hope you keep your truck rollin' - you can't beat those old dogs!!
.
Nice Work Orlen! The pics were well worth the wait.
As far as your spoiler questions... The trunk lid IS different with and without the spoiler. I have both of them. You may want to shop for a clean one with a spoiler if you can find it, otherwise you may be doing a stick on application...
We do have to find you a new front arrowhead to pop against that new paint.

Thanks Paul!
I'm hoping I can get the trunklid to work with the spoiler. Figuring the worst I can do is break a few drill bits in the process. I have a Dremal tool to cut out a bit of the reinforcements inside if I need to.
I'd be afraid to try and remove the old Arrowhead at this stage - probably more than that Arrowhead would pop off....LoL Kinda gives the old Lady some Patina.
Kinda like some Silver in her hair to go with her Pretty Face

.
I can snap some pics of the spoiler specific lid and post them if that would help.
That's a great idea!! Thanks Paul!!
.
Nice job! That really looks good. Love those Fiero wheels.

Getting my spoiler on was easy, you just have to measure twice, drill once?
Really, I measured the heck out of things, to figure out where to put the holes before starting. I used a wax pen to make all kinds of marks on the trunk lid to be sure it would be exactly where I wanted it.
Then my friend had a drill bit that looked like a cone, and we just went very slow and kept stopping to be sure we weren't making the holes too big. My big-ass Fiero spoiler stays on quite nicely.
Bill gave me the great idea to use some cardboard - I can get the holes in the cardboard to match with the studs on the spoiler and then I'll cut the cardboard out the same as the spoiler. Line the template up and mark the holes to be drilled. Wonder if it will actually be this easy....Ha haa.
.
I personally like the pic of front looking up towards the car showing the sky so nice a blue with the clouds as a back drop.After seeing the pics of while the work done and then these it really stands out too me.You did a a really good job with the lost cost approach and while tired as dirt tonight I really focused on the details in the pics you have of the shoot.I think you did a a freaking great job.And I did notice the plate change!! Many miles today and just out of diesel not gas.Kudos orlen

I agree with Ron. I love the sky blue Bird against the cloudy blue sky picture. That upwards photo angle is what is sometimes referred to as the"hero shot" because of the "looking up to someone or something" perspective. You took great advantage of the natural surroundings. I also really like how the sky blue meets the darker blue mountains in the back ground which corresponds to your paint scheme, making those stand out pictures. Those are the types of pictures I call "the money shots," the ones that have the greatest value. With the affordable digital imaging technology today, the big difference between a professionally taken picture and one that looks like it was taken by a pro, but really by an amateur, is an awareness of / use of the background, perspective and avoidance of mergers and distracting details which comes with experience and an eye for detail. Great stuff!!!
I'd say it has held up pretty good in those pics for the cost and time involved.I would ramble more but I am pretty tired after dealing with a 12 hr day and 540 miles and no shortage of idiots on the highway today.It does look really good orlen maybe when I am not just half charged I will add more commentary.
I really have to hand it to you, Orlen.
I have stayed quiet about your brush-on paint jobs as I am more of a powdercoat and pay a guy (but beat him up on the price) to paint my car kinda guy than a rattle can or brush-on type of guy, but that paint job has appeared to hold up rather well !
A question and maybe a suggestion, tho... Do you use any type of treatment (wax, wd-40 or kerosine) to protect your finish or you just clean it regularly and go ?
I'm guessing regular automotive type wax wouldn't work well, but I wonder if wd-40 sprayed on and buffed off, an old-school kerosine bath every once in a while or even something like a paint detailer spray may help the finish stay shiny-er and protect it against the elements ? I think the biggest issue you have to worry about with that type of a re-coat is moisture penetration into the finish and being proactive in protecting the finish may be a way to prevent or at least hold off the need to re-coat your re-coat..
Oh, and by the way, I had a set of those 14" early 80's Z24 alloys wheels you have a few years back. I had them powder coated (imagine that?) a satin black finish and I took silver pin stripe and applied it to the raised parts of the spokes and they end up looking absolutely AMAZING. Wish I had taken some pictures of them on my old '91 Cav coupe or even better, kept them for winter wheels for my Wagon....

Anyway, great job on the paint job, and thank you so much for giving me so many ideas that I will definitely incorporate in my future attempts at restoring and keeping my babies alive !

~ Mike ~
Thanks for the kudos Mike!
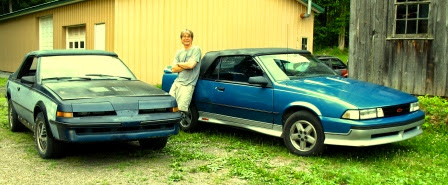
My goal sharing on J-Body was to simple offer an alternative when one might be on the fence with one of their own and weighing the costs and thinking of giving up. These 2 - 1st gens weren't destined for much of a life as it was. Both suffered with rust and really wasn't worth pouring a lot of funds into them, however they were still running and reliable. Neither of them are of any special interest.....a simple wagon and the Pontiac is a base Coupe. I only paid $350 for the wagon back in 2002 and more recently $450 for the Pontiac back in 2011.
I've had many cars over the years that I gave up on simple because the body began to look so bad I simple didn't want to be seen in it anymore. Nowadays the examples running around with clearcoat peeling off is unbelievable.
Another fact is all the more modern vehicles out there today are ever more complicated and prone to cause ever more trouble - when they do it isn't something you can repair quickly or cheaply. A fine example these days is the water pump - a fix back in the day was a simple chore but nowadays with the double overhead cams the procedure usually involved special tools and sometimes all but removing the engine. Even changing plugs can be a nightmare.
Sorry to over explain..... But I decided to try and learn a different approach. I am STILL learning....Hahaa.
In answer to your question I refrain from using any protection on the color coat. I understand your thinking, but I ran into an nightmare when I tried TurtleWax Ice on the Wagon years ago trying to hold back rust bleed through during my rattle can days. Oh My what a mess I had!! It took years - yes years of painting and having to go back down to the metal and try again and again where the Ice had gotten into the metal and prevented the paint from sticking to it. I had fish eye and had to actually get then metal heated up from the sun or halogen lights to make the paint dry before running - I couldn't leave the metal bare. I finally got a decent paint job back on the top of the wagon this year and I was so relieved!!
So I'd rather deal with some fading and rusting than have to overcome the protective after effects when the ineviable happends...Hahaa.
You could say the car covers are my latest attempt to provide some protection. I am still having issues with the moisture getting in after hard rains. as you can imagine the top of the wagon traps water on the car cover in between the rails - I have removed the cross members and tie downs but the chrome rails remain. Lately I have place some pieces of Styrofoam under the covers to aid in helping the water run off the top and hood - seems to help. John Masson mentioned to me his similar experiences and suggested adding a regular tarp over the car cover to repel the rain. I picked up a heavy duty one today to try over the roof section to see if it helps.
Yeah I am looking forward to enjoying those Z wheels!! - I also have a couple pair of 14" Alloys for the Pontiac as well, but alas I need tires for them all and that is another journey...Hahaa. Old cars (paid for) and nice tires. Shiny nice newer car(making payments) and bald tires. I have lots of wheels and the tires I do have on them have lots of tread!! Some folks are lucky enough to have the best of both worlds, but I'm not one of them LoL.
My Motto is "....there is always more sandpaper and paint!" Ever Onward!!
.
Ok , little update - the Styrofoam has made a vast improvement with the Pontiac.
We have has some hard rain since I started experimenting with this. Placing the Styrofoam on the hood and top of the Coupe encourages water runoff and also provides an air pocket to keep moisture from just sitting on the surface.
My solution with the Wagon is to simply replace the cross members and cut a piece of plywood to fit over them - this will lift the cover off most of the top area and Styrofoam for the hood will do the rest.
Hope this might help anyone out there thinking about going this route
.


