I just ended a 15 1/2 hour scramble to finish wet sanding my door sides and finally get some color on them. I started buying supplies after breakfast and began work at noon. Near midnight I finally had the doors and garage ready to begin using my new Pro-Tek 4000 HVLP gun with 1.3 tip to shoot base coat / clear coat. The gun cost $113 and the base coat / clear coat paint supplies were $375 so far, which does not include the $40 in body filler and glazing putty. I shot epoxy primer on first, then had to wait an hour for it to dry enough to top coat. Then I sprayed 3 coats of 87 Sunbird silver, followed by a mist coat, finishing up with 3 coats of clear. Though probably not as smooth as those southern boys roll, I was satisfied that the metallic silver is not tiger striped, though a bit marbled here and there because the epoxy under coat didn't flow out smooth enough to not effect the way the metallic flakes lay down and reflect the light / color. I could have a waited a day and leveled the epoxy primer by wet sanding it, but I need to get the panels back on this car since school starts next week, and because they are just hidden surfaces most of the time anyhow. There is a bit of orange peel in the clear and only pretty bad in one noticeable spot. If I wanted, I can wet sand the clear to level it and buff the shine back, but again, its a door jam. If I can get results this good on the exterior body, I will be happy. I plan on buffing out the paint anyway to make it smooth to make up for my lack of skill, which is why I chose base coat / clear coat in the first place. Also, this is the entire reason I am building this car.....to build my skill set so they are refined when it comes time to switch back to doing the body work, paint, and finishing my 1926 Willys Overland touring car high boy hot rod. I think it will cost me about $700 in supplies and $300 in new tools and equipment to put a $2,100+ paint job on it. I think paying $.33 cents on the dollar for decent two tone squirt is a pretty good bargain, but not quite as good as those high rollers get!
Anybody else putting a new dress on their darling besides, Orlen and I? How far are you from paint Wayne?
I took a rectangular, gallon metal can, peeled off the paper label and painted it at the same time I painted the doors. Next time when I add the dark sapphire blue, I will paint that on the can too. I would like to have my buddy who does pin stripping and vinyl sign lettering make it a label that reads : Can Do. Put my picture on the bottom silver section with a before and after picture of the car on the sides, and fill the can with water. I want to give it to my dad as a thank you and reminder of all he has taught me to do on cars and the "Can Do" attitude he has instilled me. The contents represents all the sweat and tears I caused him to endure while getting to this point. Dear ol' dad is the most important tool in a boys tool box! That also goes for granddads too Orlen!
Where's the pics? Let's see your hard work! I need to paint mine again. The clear is peeling off on mine. I haven't decided if I want to keep it the same color and scheme or go with that synergy green on the new camaro.
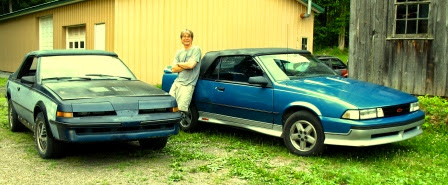
Alright Josh, here are some picts that show where I started and where I am at in 10 months time, though the picts do not show any of the mechanicals or underneath that was done the first 6 months of ownership. And for those tuning in late to this story, I purchased this Bird for $250 that had been stored for the last 10 years.
What I started with....a barn find of sorts, though it really came from a back alley row garage/

This is the state the body currently is in. I took this today.

Some of the rust being replaced in the drivers door bottom. I had already replaced the from corner, and still had the 2nd half of the door to go.

Pair of freshly painted door sides, outside in the sunlight

Pair of freshly painted door sides outside in the sunlight

Passenger side door hinge end. If you look closely to the left of the big round hole, you can see a huge sag in the epoxy primer which shows through the top coats too.

Drivers side door latch end depicting the all important ASC sticker which has been chewed up and faded over time, as well as blue overspray from a previous Macco paint job. Glad I can't claim that error.

I should have posted this pict after the rust replacement photo since this one shows some of the rusted metal now in its finished state for photo comparison. It also allows you to view the silver in direct sunlight, indirect sunlight and shaded sunlight. I love how flashy the silver is. It pops much better than the example I saw in the junkyard.

I hope to paint the door jams tomorrow and am not sure what the final look will be, if they will be two tone or not. As expressed, it sure is a bunch of work for a whole lot of nothing to do so, but quality extends to the details.
hmmmm, that's crummy the photos from Picasa are not linking over, as well as the time wasted trying to do so. Sorry about the missing picts
My painting that I was hoping to have done in June is now looking more and more like late September.
I did make some progress today, got the passenger door on, the outer lower hinge bolt on the driver side is giving me trouble, seems to keep going in on an angle and I can't turn it all the way in.
I installed both power locks as well. I hope to be back at the struts on Wednesday night, hope to be able to get that darn tie rod bolt on the right, then hopefully the left side will go smooth (something has to go smooth one of these days).
I can't work on it next weekend, busy all day Saturday with my monthly breakfast with friends, then maybe another car show I can't show off the Hawk at.
I also need to spend time studying harder than usual this week, I have an audition for Million Second Quiz on Sunday, then off to a friend's birthday.
Wayne I put my lower hinge together at your recommendation and was able to get the door check spring on now so I wouldn't scratch the fresh all up trying to deal with it later.
Do you access the front hinge bolt through the front fender by removing the plastic inner fender and then the rubber air dam? Since I cut the hinge pins which left the lower hinge half on the car, it was a straight shot to that bolt being out in the open for me.
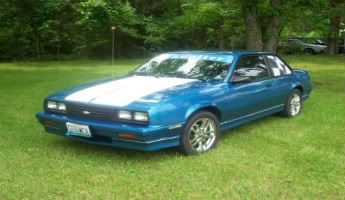
Hey Josh this green looks pretty smokin' hot and the white just makes it look all the cleaner.

Ha haa Bill....that's why body work cost a Kings Ransom at the Shops -lots & lots of man hours!!
Take a deep breath......... - Your work looks Great!! Remember there is no fire to put out - you have lots of time to work on your 'Bird!!
This is one of those Pontiacs that was in desperate need of a whole lotta TLC and it'll take a lot of time to get it where you want it to be.
Every student learns at their best pace - the teacher sometimes must be patient?

The longer the journey - the sweeter the rewards!!
.

door bottom during repair
Drivers door bottom afterward. Note that most of the bottom metal was cut off and replaced in sections because the metal that was touching the door skin was trapping water and the door skin was soon going to rust from the inside out so by cutting away the door bottom, I was able to wire brush and paint the skin inside that would be covered over by the new replacement metal. I didn't get too out of hand with straightening the body filler or bottom, but rather was trying to smooth the area so the repair didn't jump out. This photo allows you to view the silver in direct sunlight, indirect sunlight and shaded sunlight. I love how flashy the silver is. It pops much better than the example I saw in the junkyard.
Pair of freshly painted door sides outside in the sunlight
Passenger side door hinge end. If you look closely to the left of the big round hole, you can see a huge sag in the epoxy primer which shows through the top coats too.

Drivers side door latch end depicting the all important ASC sticker which has been chewed up and faded over time, as well as blue overspray from a previous Macco paint job. Glad I can't claim that error. If you look closely near the top center, in the back ground you can see the
GT shell that I hope is going to the recyclers very soon. My brother has to get his recently acquired real 68 Z28 Camaro project car off his trailer.
To give you guys and appreciation for how affordable our cars are, he paid $14.5K for his resto candidate. He did get a bunch of NOS sheet metal for that number, but those guys pay stupid money for their parts.
Stupid Money - Seller: stupid for not selling at that outrageous price Buyer: stupid for paying that ridiculously outrageous price
but.....to each their own, and it will be a killer worth more than all 3 of my jbody drop tops when they are restored.
Tomorrow I hope to get the car door jams painted silver. Not sure if they will be two tone or not. I think its details like that that amp up a cars quality beyond the obvious items, but I think I may pass on that due to getting the doors back on the car and on to other pressing body work priorities. I have to get this car painted this fall before the temp. gets too cold, BUT need to do body work over panel replacement in my Subaru and MUST do some body work to repair some deer damage to my girlfriends Yaris. That job requires the entire drivers side get painted. That job is also an insurance job which pays $800 before material expenses, so I am relying on that money to pay for my new body work equipment and some paint supplies. We all know that there is always something to derail our best thought out plans.
Bill, first of all that is the green I am talking about. I think it would look great on an old J-body. Second, those doors look amazing! Don't beat yourself up over that run I've seen much worse from body shops. When I painted my GTA a few years ago I used single stage on all the jams and areas that aren't seen. I used a urethane base coat and a separate clear coat on the surface.
Bill--
if you have the fenders off the car, I would guess it's much easier to get to that front lower hinge bolt (11mm).
I take my skeeney leetle fingers and slide the bolt around the pin and get it started by hand, then comes the cranking with the open/box wrench. Maybe a quarter turn per time.
yesterday, got the passenger one installed in about 15 minutes, spent hours on the driver side and still couldn't get the bolt in straight for some reason.
First do the upper hinge since it's just the pin to put in there, that holds the door up while you attack the lower hinge. I've found it's best to start with the inner bolt (15mm) as that one gives you a large amount of leeway for hinge placement. Don't put it in all the way, just far enough so it doesn't come out the other side as it will be in the way of your wrench when going for that lower bolt. Having this one in a little bit helps line up the front hole.
Bill where did you buy your paint gun(napa maybe).I eventually will buy a similar low cost gun to do a trunk lid for mine.I have the replacement part and will probably go with a single stage paint from the napa paint shop here.I do have to sand down the part it was glittered and cleared so lots of sanding.I was so super tired yesterday I just ran out of focus to read what you did.In short you are on track to make a nice ride of what you have pieced together and corrected.Good work

Ron it came from Cashers in Harrisburg Pa. Below is the link to the web page I viewed and purchased it from. My school buddy who was the votech autobody instructor and now is the local area automotive refinishing tech. rep. recommended the gun to me as a hot seller they are constantly selling. He said that he has never had one of those guns returned, though he has had Sharp paint guns returned because of customer dissatisfaction. My buddies store quoted me a price of $140, which did not include tax. I asked him if he thought the owner might price match Cashers and he said to just buy it at the best price I could find. I told him if it was only a few dollars more I would buy from them, because he took the time to recommend it and give me other advice, but that a $25 difference in price would pay for the gallon of body filler I bought from them. To me, that's a chunk of change. Also, Cashers had it to me in 3 days time, being shipped by Fed Ex for free. They also did not charge me tax, so my bottom line cost was a few coins under $113 with no other hidden costs.
http://www.casherspbe.com/product_p/prk-4000gh.htm
Pro-Tek is a Canadian based company that has a huge product line which deals in refinishing equipment. My buddy said its the kind of gun that puts out a better quality job than the price reflects and is a great gun for a guy like me to buy. He said they are company in which few DIY guys have heard about. He also recommended a few other guns that were priced about $350+ I was thinking of buying a DeVilbiss Finish line gun for about $180 or an Eastwood Concurs gun, but went with this one mainly due to the recommendation based on the mans credentials...votech autobody teacher turned paint tech. He also told me that that was the gun he himself wanted to buy next, but in a mini gun style for doing small jobs. He said he other guns that cost hundreds of dollars, but that was his next brand of purchase. I figured that was a good recommendation and would save me a few dollars too. I figure that though a good gun has its merits, but that it honestly won't help me much because when it comes to spraying paint from a gun to do a whole car, its the operator that is the most influential factor to getting the highest quality result. Because I will be doing painting so infrequently and think that my skills will just not give the type of results that justify paying a ton for a gun. I figure I will be the key reason I will get less than optimum results to my paint jobs, an expensive gun will not save my paint job from the operator. Its also for that reason that I chose to paint base coat / clear coat because I will able to level out the inevitable orange peeling and doctor up the paint job to be as smooth and shiny as I desire which will be the key aspect which will make up for my lack of skill. More power to you if you have mastered spraying single stage enamel. I might be ok with spraying just a small panel like a deck lid, but from what my dad describes painting with that stuff as being like in the late 60's and 70's, I don't think I could keep the necessary "wet edge" he says is required to have the paint flow out to level itself and become smooth, which is needed to paint a whole car. Rather than risk disasterous results in trying, I chose the option in which the odds are in my favor of doing a good job because of the workability of the finish at almost point in the process. I say this because the right undercoat can be put on and sanded smooth if an issue occurs, and the same is true after the base color is put on, runs and dry spray can be leveled by scuffing and then another coat of base put overtop to hide the repair, and the clear can be wet sanded to level it and the shine polished back on to a brilliant luster with a buffer. Yes....its a ton of work, but it its the only sure fire way I know to get the best possible results. Honestly I did shoot the front bumper cover and hood on my blue Z24 in my sig pict with single stage enamel. It didn't turn out so well because the hue does not exactly match and because the undercoat did not flow out when I sprayed it this winter. I did the best I could, but didn't really care what the results were because the only thing I did not want to happen was to drive a blue car with gray front bumper cover and white / spotty gel coat hood. I just wanted the whole car to be the same color so my girl friend would be embarrassed to ride in the car. The immense amount of dents and HUGE crease in the drivers door are embarrassing enough, but we love that convertible. I can't believe how good it looks in my signature picture because the car is actually a really hurting unit that needs a bunch more TLC...which expect someday it will get.
Hope that helps point you in the right direction and helps to keep some change in your pocket.
Bill don't forget the flex additive for your non-metal panels and if you have urethane bumpers on your car you may have to "sweat" them as some shops say. Basically what can happen is the oil that is used to produce them leaves a residue behind and it gets absorbed by the bumper. It doesn't start to come out until heat is applied to it like a sander or heat lamp. If left alone it will cause peeling. My dad has a heat lamp he uses and he's had a few that had so much residue in them that they were litterally sweatting.
Josh I stumbled across some information those early bumper covers being troublesome to have paint stick to them. Mine has a bunch of the paint coming off. My paint rep buddy said to use Bulldog flex additive to the clear. They have two products, but I was told to get the adhesion promoter / flex additive one in a quart can. I think it was like$36...not cheap stuff. I was instructed not to put epoxy undercoats on then because it is a hard and brittle coating. I should only use a sandable filling primer. I am using the Limco 4 paint line which is a very cheap paint system. Paint rep recommended NOT using the hardener in the paint option. He said, though the paint will be softer initially, that the benefit is that the soft base coat color will not need the flex additive that way I don't have to worry about the bumpers getting a mismatch because they were sprayed with a bit of a different mix. I was told the flex additive only was to put in the clear coat and that if some of that clear was sprayed onto the metal panel surfaces, it was ok.
I have never heard of sweating a bumper cover, but would be very interested in the detailed procedures, do's and don'ts, tips tricks and hints to promote flex part adhesion. I wonder if that same concern holds true for the GT fender flares? The rear spoiler is a rigid material and I suspect not of the same concern.
Thanks for pointing that and the concern. When it comes to painting, its an mechanical adhesion processas well as a chemical process, one in which is a black art for the newbie.
You should only have to worry about it if its a urethane bumper. Most are yellow in color when stripped. Also a urethane bumper will be very flexible when its off the car. If its been replaced at one time it may have an ABS plastic bumper like what all the late model cars have. ABS bumpers are much more rigid. I would still use a flex additive if it is urethane because I skipped it on mine and the paint is flaking off my rear bumper. I did get 8 years out of it however.
Both the bumper covers I have are yellow on the back side and the blue one on the car now shows the yellow core on the areas the paint has flaked off. This is why I am very concerned about adhesion and proper surface preparation.
Please tell me more about this "sweating process" so I don't make bad assumptions about the process and ruin the shape of my bumper applying heat. I assume it is done with the paint stripped off and the cover sanded for straightness. What should be used to remove the oils, wax and degreaser remover or some other item. I am concerned about contaminating the cover with a cleaner product thinking it might become absorbed and retained in the bumper cover promoting an adhesion problem.
Thanks and I may just go the napa route because here locally I have a true paint shop which mixes paints and they have guns that spray similar and or of that grade.I just was curious and if I ever get my time to start working on my car on the mechanical stuff already.This week is a no work on car due to need to do's and a meeting at work Friday (my day off duh) but have to go.I figure one way or another I will get vacation time in sept! Then I will take extra time off to get my rear suspension add on's done and brake work and ebrake cables and then the front (oh brother lots more to do).I am doing a full front upgrade new struts,a arm bushings,tie rods etc.Let me not get side tracked on the paint stuff.
That's right Ron, stay focused on the task at hand. When it comes to painting, if your not experienced at it, it can be an extensive research topic or long learning curve learned the hard way.
I had a pretty good shoot today painting the door jams on the body. I had a bunch more confidence and think I did pretty good setting up the gun, NOT in the wide open settings which is the typical answer most guys tell you to do, which you should when painting a whole car and want a 12" fan. But when you want to jam the car and only need a 6" fan, how is that to be done? Well I just experimented with water until I figured it out and set up the gun as desired. I wasted a lot less paint that way today. I did not have the best of lighting. While I could see where the paint was shooting on, I could not see how well it was flowing out. I didn't have that angle which the light reflects just so off the wet surface to gauge how well it was going on. I blew it on by intuition and feel. I did wind up with 2 long runs in the clear near the latching bolts. Oh well, I suspect that I will sand them out and buff the shine back on to practice that technique and correct the error. There is some orange peel in the clear, but not enough for me to worry about scuffing and buffing the jams, BUT there are some super sweet flowed out smooth spots that leads me to believe that I just might get a handle of this voo doo yet. It figures that the dog gone hinge sides seem to be run free and some of the smoothest I shot. I think I was but further back from the car there and maybe too close on the latch pin end.
Can't wait to see the car with the blue beside the silver... maybe this weekend.
Bill, yes it will need to be stripped. I would suggest preping it on the car since it will hold form much easier for you. My dad has allways used good ole Windex and a paper towel to clean off the residue. Next you will have to mount the bumper on a stand and probably build a structure behind to support it so your form doesnt change when it gets hot. If you don't have a heat lamp a good sized work light will also do the trick. Normally you want to bake it for 3-4 hours and make sure to check that the heat source is not too close. If it has any residue left it will feel oily when its hot. Do it until it stays clean.
thanks for the procedures Josh. I will be adding that to list "to do list"
I painted the car door jams silver. I was much more confident during this second painting experience. I was able to cut the paint fan down from 12" to about 6". I was also able to get the undercoat primer on much smoother than on the door edges. This allowed the paint metallic flakes to lay down flatter, hence the paint was more even in color and the final surface to be smoother. Though I did get a long run on each door jam near the latch pin, I was satisfied with the results.
Here is a pict of the passenger side door jam. This was the first time I saw this area in silver since it was blue since the car was built.

I have since installed the doors back on the car. I chose not to two tone the jams since little paint is applied and more effort than it was worth, especially since I have to start back to work on Monday, so the abundance of work time has ticked off.
I am so glad I put the lower hinge together and installed the door check spring before I painted the door edge. Wayne's method for door installation is one I recommend. Thanks for the help Wayne/
