You have some serious rust going on down under there. There are soo many different ways to address. I grabbed some rust converter and a quart of simi-flat black Rustoleum and have been working on my wagon each year as I get the time too.
Keep a close eye on those brake lines my friend!! I had one blow out on me going downhill right at a traffic light when it turned RED on me. Needless to say all I could do was blow through with the back wheels skidding via the e-brake. Luckily there was no traffic there that moment..... Now I check everything each year religiously!! Block up all 4 corners, stand on the brake pedal for a minute and then crawl under to inspect all the lines for wetness. I even had the Pontiac spring a leak on a brake line after taking a ride on the back of a Rollback. I guess the shaking cause fatigue in the brake line - no rust at the fault point.
Springs look OK to me also.
Rack Boot is toast - I don't think you can do anything with it. You'll never be able to get any sealer on the back side between the fire wall and rack and the boot will just tear back open again. You would have to remove the rack out of the car to replace the boot....Not sure if you can just get a boot. I recommend placing a "pick up a rack" on your to do list when you get lucky at a salvage yard. Having a 4 cyl. makes replacement far easier than the V-6. Added value to removing your donor will be the invaluable experience learning how everything comes apart!!
Here is a couple of threads to help when the time comes Wayne -
http://www.j-body.org/forums/read.php?f=28&i=16277&t=16277
Here is one on pulling the steering column:
http://www.j-body.org/forums/read.php?f=28&i=12825&t=12825
.

Good info on the rack replacement there Orlen! Saves me the time of looking for it. I have to do my rack once the weather gets cooler.

any idea what happens if i run with this rack as it sits?
I don't think you'll have any issues running rack in that condition. This isn't like the CV joints on the axles. These Racks were prone to failure as they were. The first symptoms you are getting close will be lack of assist for the first few seconds when you start up cold the first time of the day. That lack of boost will eventually get longer and longer till it gives up altogether. I got by with the one in my wagon for about 4-6 months with it acting up before it finally gave out.
.
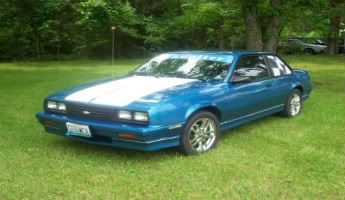
The Hawk took flight today! I drove it to the garage for its alignment.
Felt good driving it, nice weather, windows down. New struts/shocks gave a much better ride than before. Can't wait to get it back this week to drive it for real!
Then to make a few final decisions before heading off to the body shop.
No more pics yet, but forgot to mention the lower body brace...
Won't fit! I have the 1.8 and the downpipe going to my cat is in the way. I guess I'll wait for the time to come to replace that pipe and get a custom bend so I can get the brace on.
I would love to have that. cool wip bro!
Please god leave the stick on body scoops to the illegal immigrants and ghetto cruisers, they have no place on a clean classic car such as ours, its just tacky as hell.
With the environment your in those areas do not surprise me.Nice to see the problem getting resolved a touch at a time.

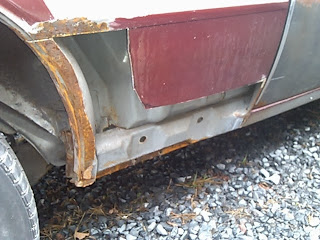
Starting to look like quarterpanels again...
Much rust in there, including frame rail and both side rails; but the Hawk is saved and will live for a long time to come. Hopefully back on the road just in time for the nice weather for me to take it off the road again

This summer I need to drop the axle to sand/paint and rebuild the cups for the springs. Then I need to sand and primer the doors and the hood.


Great Progress Wayne!!
Just warms my heart to see another rare 1st Gen getting some life - saving TLC!!

Keep the photos coming - Enjoying your Adventures!!
.
BIG improvement wayne!! I can see your getting the things to address in order.I also have made major strides with my own (sidetracked car) but finally running and inspected!Panels look sooooo much better.
Did you use patch panels or just regular chunks of sheet metal? I have rust in the same area on my left rear quarter and left side rocker. I'm kinda nervous to remove that ground effect. I feel like I have a surprise waiting.
This sure ain't my handiwork, it's at a body shop. The guy is really talented. He said something about nickel plated...does that make sense?
Nickel plated means it will be corrosion resistant. That's good metal to replace it with.
Pretty new looking quarterpanels!


and a remote starter

Gotta love this: the starter I bought from Amazon.com, and it didn't come with installation instructions! Viper doesn't want anyone but their "authorized sellers" installing it, so they won't give up a set of instructions. With what did come in the box, and a wiring guide I found from an 89 SkyHawk, I think I've figured out how to install it. I'll have to play with it later as there are other things I'm doing first.
WOW Wayne those quarters are Wonderful!!
Ya did good.......REAL good!!!

Pats on the back too for the "Door Bolt" solution you discovered! Now you got 30 years of pissed off J-owners mad at ya 'cause you didn't discover this earlier - Hahaa That's ok though - it was well worth the wait, wasn't it!!
If you need to hook up your Remote to your starter......It is buried on the firewall side under the Intake Man and Water Pump Cross Pipe. Seeing those wires to get to is as impossible as getting to them. Expect to have a lot of frustration breaks when you start on that project. just a heads up!! Perhaps you will get lucky and install under the dash instead.
.
Panels look good.Tired I am
Finally got some new (temporary) seats in the car. Found these in a Sunfire GT. This car had the doors closed, so I didn't have to think about the rain having touched them, and the car had a sport interior with the lumbar support!
The original seats weren't really comfortable for me, the back wouldn't go exactly where I wanted it to, so since these bolt right in, here they are. Now when you guys tell me about various seats bolting right in, you need to remember who you're talking to. I was so disappointed when I tried to put these in and found the new tracks don't match up to my old car. So I measured the holes and yeah, they bolt right in, but on the old tracks. Over a period of a week, when I had the time to deal with it, I put these seats on the old tracks.
I'm glad to have them in, much more comfortable to drive the car now. These will do until I can get the $600+ to spend on the seats I really want.

Not bad really and comfort is def important.I know those seats I got out of that Skyhawk were pretty nice aside from the torn worn areas.I may get those recovered later down the line and there similar in the design to the one's you have installed.
Thanks for sharing the swap details - I had been curious about that myself over the years. It just sounded too good to be true - although swapping the tracks isn't too involved.
I had wanted to install a power seat in Tammys 3rd gen if I came across one.....Well this definitely blows the possibility out of the water as a direct swap. I have one out of a Caddy I might be be able to adapt in there one day.
The dark seats looks pretty good with the Red interior. Wonder if the 3rd gen rear seat might fit in the back? I managed to get the Firenza Sedan rear seat on the Pontiac Coupe but it took a lot of work to make it fit. The Sedan rear seat bottom is wider than the one in the Coupe!
Good Post!! Thanks Wayne!
.
I was never a fan of the color red, but I seem to keep ending up with red cars for myself.
I have black floormats, and like how they look with the red that's there, so my plan is to eventually go with some sort of black & red interior for the overall look. This way I don't have to worry about the color of the dashboard and other parts that I wouldn't be able to find or realistically paint and be satisfied with the job.
I can relate to your color delima!
I went through many a vehicles in my lifetime and had some darn nice ones that I didn't care to hang onto. Finally I figured out I prefer the colors I have now and must say it has enhanced my enjoyment over the years a lot. Discovered through painting them I can get them just right for my eye and in the end I can't help but like what I have.
So my 2 cents worth is while you are deep into your project go ahead and make it the color you prefer. Keep an eye out for a 1st gen with the interior a color you want and simply swap out what will work and you and paint/dye what doesn't. Short of the dash I'd bet most 1st gen coupes and even some hatchbacks interior parts would work in yours. Doesn't have to be perfect - just good enough for yourself!
Enjoy it!!