You are right John! If you can get started on the horizontal surfaces here before the rust starts you are ok, but once the rust sets in it is so hard to cope with.
Bottom of these 2 J's I have are in pretty good shape underneath. From the front to the back wheels it looks like new under them. Some nasty from the rear axle back but nothing I haven't lost sleep over.
Sanding and painting are really easy to work with and not even expensive using these methods. I'd much rather deal with a bit of this than be dealing with a transaxle slipping. Actually that is my real concern is what I'm gonna do if the transaxle starts to go...nothing lasts forever and replacement or repairs for them are ridiculously priced.
This is the ONLY car I have kept for 11 years (purchased 8 01 02) and used so much. Small local runs - to the store or work or to take Grandson to school. Think I've only put something like 37k on it during all these years. I went from being so tired of this Wagon I hated it to putting a paint job on it and falling in Love with the silly old thing. Can't begin to remember what all I have carried in it. I had this before I had a truck, so you can imagine what it has been asked to do over the years!!
But since everything I have is old, it is impossible to keep up with everything.....But I do what I can.
.

Well, noticed the ole rust popped up the paint while I was off on my 5 day break so it was time once again to work on the wagon's top. I had promised myself when this time came around it was going to be time to do a proper sand down and repaint of the entire roof section. Sanding down a "Longtop" is a chore and I swear I had to run off a couple of Piper Cubs trying to land on it while I was working.
This old J has really taught me a lot over the years. It is more than a little sentimental. I blew through this project in ever short amount of time as I get more experience at what I am doing. 5 hours with the 1/4 sheet sander and it was ready for painting, and this top was in horrible shape since I had at least half a dozen patches on it with some thick coats of paint on some of them! I used 60 grit this time and kept the air compresser running - blowing off as I went along. Used just 2 sheets of sandpaper on the entire top! Rolling the paint on quickly is benificial as it allows the different sections you are working on to blend in together - so the quicker the better. Not too fast to be a sloppy job - there is an art to this stuff. Art is an interesting word for this kind of painting since I wind up using art & craft brushes in the drip moldings and then dab a foam brush at the areas above the drip moldings to remove the brush strokes and blend in with the foam roller area.
2 Prime coats, 2 color coats. The enamel paint it about 2 years old in the cans but just as fresh as the day I bought it. Put the gallon into 4 quart cans when I got it so it doesn't skin over.
Well here we go again....

.
Budget painting - I used old fashioned masking tape. I use the thick roll though - covers much better.

.
Tried to take the paint down into the old primer , but some places wound up getting down to bare metal. The 60 grit sand paper worked well, and not much build up blowing off with compressed air. Placed a fan to my back to help blow the paint dust away - really helps!

.
Top Tip!! Buy some cheap bed linens at the thrift store and use to cover car off with them! Very effective - quick to tape up and re-usable!! They are Great!!

.
Like I said above - art brushes and foam brushes are great for getting into those drip rails! Glass Jars are great - just wipe the top off and scew on the lid. Much easier than cleaning the top of a paint can!!

.
How to initially soak the foam brush....Dip end in paint

.
dab the end on a piece of cardboard - a cerial box or pizza box does great!!

.
Then roll the roller in the paint to get the foam full of paint.

.
And 1st primed coat is done

Here are a couple of good shots of the drip rails being painted first. The blue shows up well over the primer.

Oh yes - wrap up your paint can in aluminum foil and you don't get paint all over your can.

.

.
1st color coat

.
And after 2nd color coat with all the tape removed. Takes about 1.5 hours to paint in the drip rails and along the back hatch then roll on the top each time. About another 1.5 hours masking up time. About 8 hours altogether plus the 5 hours sanding makes about 13 hours.About 1/2 hour removing all the tape. Oh yeah about another hour removing and reinstalling the roof rack. We will call it 14 1/2 hours. To bad I cant charge myself for all the work...Hahaa!!

.

.
Great Results Orlen! Way to stay on top of the rust gremlin. I was wondering what you were up to this weekend - I see now. I took a pass on my usual Camaro Superfest weekend as I was tired from Chicago and had some projects to do. My big projects were getting a bathroom painted, troubleshooting our Uplander brake codes, and the rear brakes on the Sunbird. I also re-thought my strategy on the front control arm.

Picking up that 94 Sedan this year has proved to be a real game changer. That along with the car covers has made it super easy to be able to get ever more use out of my trusty old Garage. I can now have the time to get projects done that I used to try and rush through so I didn't have to leave the Sunbird out in the elements. I also have the luxury to run the Sedan while I get down and dirty with the older machines as needed. It was nice to be able to tackle the old Long Top properly for a change!!
I agree regarding the control arms Paul. After inital WTF and a little pouting it seems just as well to be simple and replace the bushings and ball joints in them and reinstall. I sure am glad I found this information out the easy way!!
Finally a weekday with 0% chance of rain!! I get to drive the Pontiac to work tomorrow Hahaa...........Wheeeeeeeee!!

Life's little pleasures are truly the most enjoyable!!
By golly...... I do believe I am really injoying my 50's - things seem to be really clicking right along!
.
Nice work orlen and just protecting the older rides can be a real task.I think I know about taking care of my own plus some extras too.

Looks great there Orlen.
Busy week for me, had my annual 4th of July cookout bash, but not much time for the vert. We actually took the Mustang vert to our local parade this year and not the Cav. First time that I can remember since 86 not driving the Cav on the 4th with the top down.

Just a quick post this evening. Been giving the old Wagon a through going over and after oil chance , chassis lube and brake check and bleeding I decided to crawl under to see what is going on under there. I've spent some considerable time with enamel paint and brushes working on anything I find in need down there over the years and where I've been tending to the paint has really made a difference down there. Now it dosn't look like a new car , but I have more rust troubles on top of the darn car than underneath it.
I recommend painting anything you see brown on. Hell I even painted the exhaust with the stuff and full well knowing it isn't high temp paint I had low expectations. Unbelievably even the enamel on the exhaust has been working it's magic too.I've had that exhaust on there since 2008 (standard mild steel) and it hasn't rotted out yet. So I went ahead and slathered on another coat on the exhaust where the paint has come off - or rather where the metal has rusted and flaked off taking the paint with it.
It is a very messy process - but it really does make a huge difference folks!
.
Been busy....again

This time finally getting winter wheels and tires together for the Pontiac and Wagon.......well , and the Ranger too.
14 wheels in all (4 - Wagon , 4 - Pontiac , 6 - Ranger 2 of them are for snow tires - bigger project seems tiny compared to painting the truck this year!
All in white and all new valves!!
Tried using the Preval Sprayers this time and had great results with the Enamel paint. Cut the enamel roughly 50% with Acetone - it sprayed well and dried fast with good shine! It will be nice to have dedicated winter wheels and tires now and keep the pretty stuff for the nice weather!


.
They turned out pretty nice there as winter accessories to keep the others out of the yuck of winter.No vehicle work here just yet but my yard is nice and neat from two days of pruning and new gravel in the driveway today.
Decided to spray a fresh coat on the face of the 4 wheels I painted by hand last winter indoors, as well as a couple of extra Ranger wheels to mount some spares on to hang on the truck when I find a couple of cheap tires for them. I can run with 2 spares on the Ranger - 1 underneath and one on the carrier. These extra 13\\\'s will wear brand new tires when I finish getting them off of EBay next year. It is easy to have plenty of rubber when NOT making a car payment. I hate to take the Raised Letter tires off the Ranger but they are too far dry rotted to keep running them and cost a lot to replace.
Loosing all this weight has permitted me the energy and ability to get all this done in one project. I\\\\\\\'d been on my back in pain if I\\\'d had tried to do something like this 6 months ago. Soon I\\\'ll have all on the cars and truck and enjoying the peace of mind!

Here are the 6 I got mounted up for the Ranger today (2 are snow treads when the time arrives!)

.
Maybe next time try it with the light Blue for the truck and Dark blue for the Cavy wagon. White just screams commercial/job vehicle to me.

I understand Spike! It was kinda a popular thing back in the 40\\\'or 50\\\'s mainly with light trucks - but there were a lot more steelies with rings and caps back then too.
These are mainly for the winter months anyways. So they aren\\\'t going to be on year \\\'round.
Here Pontiac with it\\\'s turn at the camera today.


.
Nicest brush-painted vehicles I\\\'ve ever seen !


~ Mike ~
6 weeks or so back I had a couple of blister pop up - one on the hood and another on the top again. Being in the dead of winter and a only a few good hours with the sun shining really good the metal had warmed up nicely I decided to do an emergency repair. Simply using a screwdriver I scraped loose anything that wanted to come off - and the top released a huge section. All I could do for the time being was to grab a can of color coat and a brush - do it quick and dirty. Well, that quick and dirty has held up even if ugly as home made sin. Had some good weather this weekend so I decided to put the wagon in garage and do some magic on her. Removed the side mirrors ,grill ,headlight bezels , roof rack, and cowl.Used 1 1/2 sheets sand paper, 2/3 roll painters tape ,about a quart of paint, 1 pack of foam rollers, and 1 spray power power pack from Napa. Estimate the cost to be somewhere under 30 bucks.
Since I am a Janitor I've had plenty of experience laying wax and sealer on floors. This method of painting is exactly the same - once you start you DONT stop till you are done - keep moving and don't backtrack because the paint starts drying as fast as you roll it on. Each year I get a little better at this and it was really nice to come back around to the old wagon and give her a freshening up she deserved. Only heart breaker was I just didn't have quite enough time to do the whole roof section, but as I like to say there is always more sandpaper and paint....Hahaa!! One day I will get around to a proper complete repaint job on the old Wagon.


.
That is a boat load of work orlen!!!!! I would suggest buying a hplv spray gun (High pressure low volume) and you do have a compressor right? I plan on buying one so I can doodle on a small side project after the pollen goes away and stays hot as I can stand it before I attempt my side thing.I know these can be expensive but,harbor freight and even sears carry some decent ones and I may go thru napa Idk right now it is too far soon in spring to just yet.Long 13 hr day and just wiped out.The traffic today was KOO KOO or rather stupid.
They look great Orlen. Bodywork is tough work, but the results are worth it. Keep em rollin down the road. Just can't wait for the weather to warm up around here. Still probably a month away from getting the Cavaliers out of starage.
Nice end results there orlen.I would have started on sunny this week however had some prior to do's first.First mow of the season and taking my wife to a appt as she was being sedated for a procedure so,had to wait and drive her home today.Plus thurs is suppose to rain so no safety inspection just yet.It happens but,heck I have time and not buried in lots of extra things this year like last.
Must make people wonder what that is when they look in the rear view and see that front grill.
Looks like you lost a few lbs doing that body work.
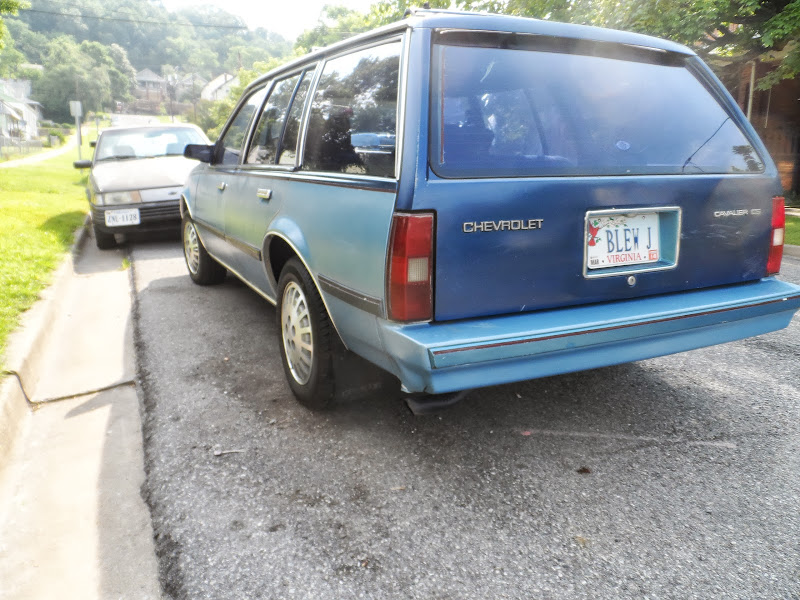
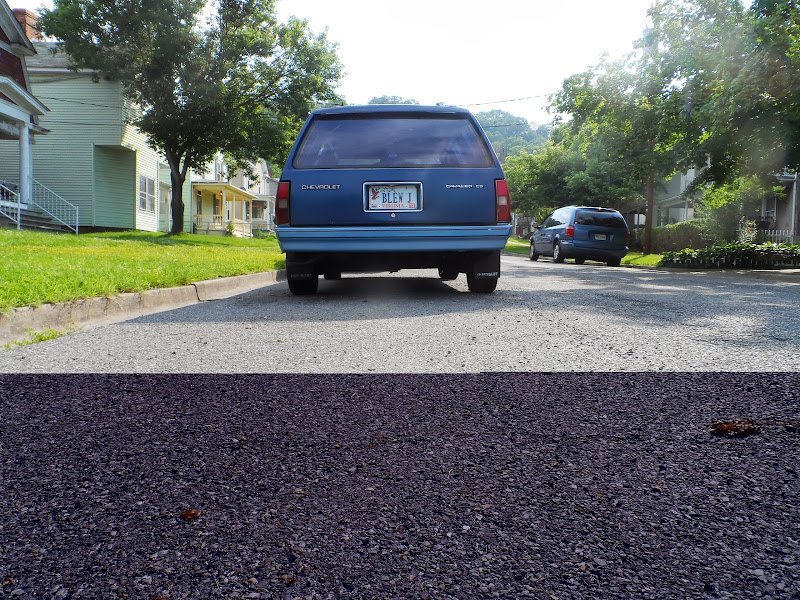
What about a shot of the back?
Geez , I wondered what had happened to Kevin from the Powernation Truck Tech show, looks like he works for Car Craft or Eastwood....................
Doug in P.R.

92 Pontiac Sunbird LE, 2.0, AT, Red / Black with Grey 155K miles. Hurricane Maria Survivor ! ( It takes a licking and keeps on ticking ! ).....in Salinas, Puerto Rico!
That Elastiwrap is pretty neat stuff. Still I can buy 9 Gallons of Enamel (nine gallons???) for their price of 9 quarts. I think so far I've only bought 2 for the Pontiac, 2 for the Ranger , and just one for the wagon (top). At this rate I'll be able to paint all 5 of my vehicles for the price of their one....Hahaa....

.
My work definitely isn't top shelf, but by golly it is cheap enough........
.