Here are the instructions for motorizing your trunk lid or any other amp racks, panels, etc.
Use common sense. Here is the basic idea to perform the motorization with the secrets I used in my car; it does not include every minor detail in the process. If you are not electronically inclined, then do not attempt this procedure. Take this one step at a time so you don't get confused hooking all these wires up. Use solder and heatshrink!
Tools and Supplies:
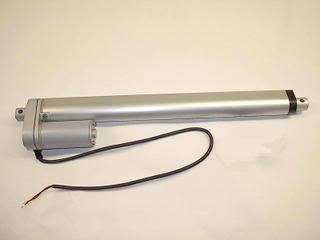
6 Linear Actuator at least 75lbs load rated from eBay or Select Products
2 Relays ordinary SPST at any hardware store
Wire 16 gauge and 12 gauge preferably
2 Momentary switches from Radio Shack
Fuses
Turnbuckle
Angle Iron
Assortment of nylock nuts and bolts.
Instructions:
1. Remove your stock spring/torsion bars which propel the trunk lid open. **Use extreme care. These can severely injure you when removing them.
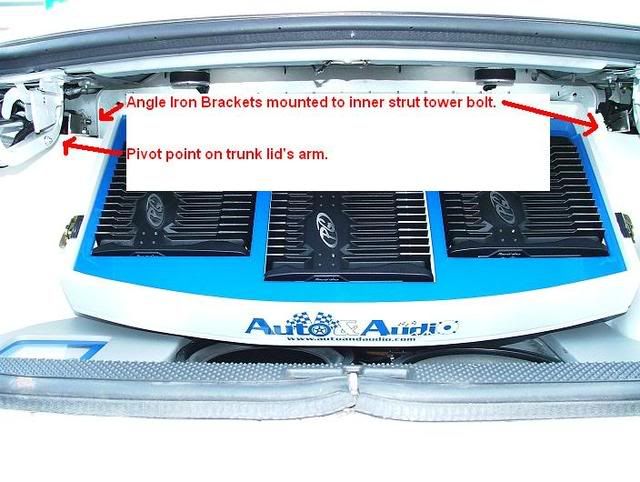
2. Cut a piece of angle iron roughly 3 long and use it as a mounting bracket to mount the linear actuator to the inner-most strut tower bolt. The actuator needs to be able to pivot left to right on the strut tower bolt; it also needs to be free to pivot up and down while mounted to the angle iron. So do not snug the nuts and bolts, use lock-tite to keep them from loosening over time.

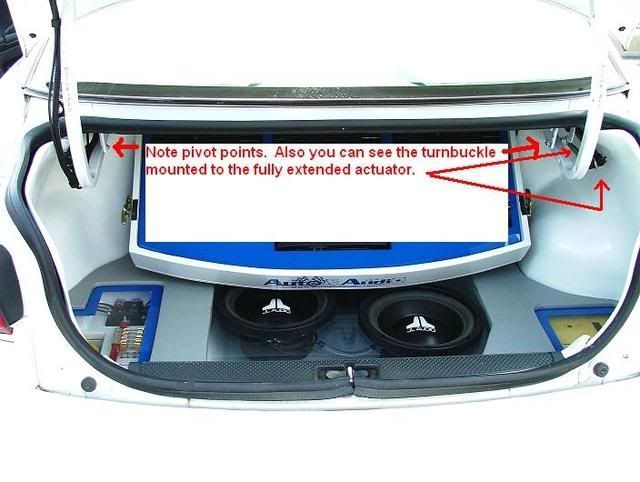
3. The most critical part of making this work correctly is finding the right pivot point on the arm of the trunk lid. You want to select the point which allows the trunk to close all the way and then open the maximum amount possible. This takes trial and error, but from the photo you should be able to get a close idea of where to start.
4. Attach a turnbuckle to the end of the actuator and bolt it to the point on the arm of the trunk lid you found to work the best. I assembled bolt-washer-turnbuckle-washer-oversized nut as a spacer-washer-arm of trunk lid-washer-nylock nut. Over time you will be able to fine tune how the trunk lid opens and closes by adjusting the turnbuckle by quarter turns. Once it is dialed in you may want to weld it because it will continually change itself with the opening and closing motion.
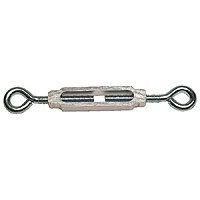
Turnbuckle
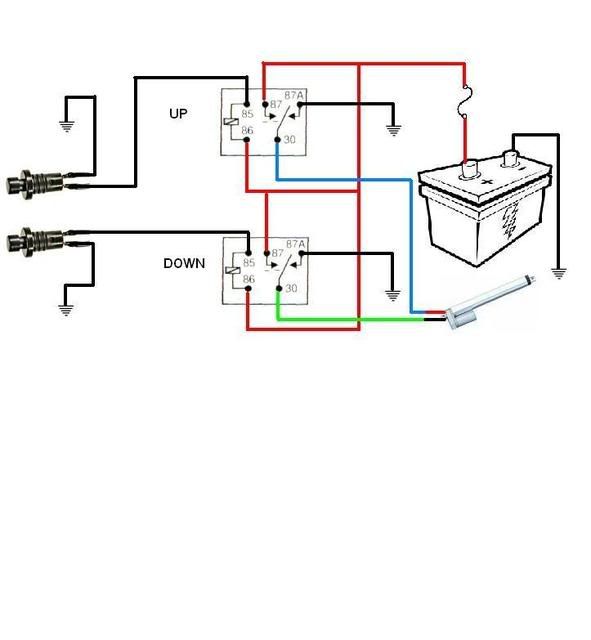
5. Next step is to wire the actuator. Since my battery for all auxiliary functions is located in the trunk, I wired my switches as negative triggers. The easiest way to do this is to use a DEI 451M door lock relay pack, but here is how to wire up just 2 ordinary relays. Solder all connections.*
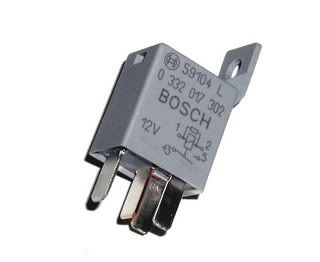
SPST Relay

6. Figure out where you want your switches mounted in the dash.
a. Ground 2 wires.
b. Run one wire to one momentary switch, run the other wire to the other momentary switch.
c. Run one wire out of each switch and back to the trunk.
1. Relay number 1 will be the UP relay. Label it accordingly.
2. Take one of the wires coming from your momentary switch up front and connect it to 85.
3. Wire 86 and 87 to 12 volts but make sure they are fused. 15 amp should do depending on your actuator.
4. Wire 87a to a clean, bare metal, ground.
5. Wire 30 to the red lead on the linear actuator.
a. Relay number 2 will be the DOWN relay.
b. Take the other wire coming from your momentary switch up front and connect it to 85 on this relay.
c. Wire 86 and 87 to 12 volts but make sure they are fused. 15 amp should do depending on your actuator.
d. Wire 87a to a clean, bare metal, ground.
e. Wire 30 to the black lead on the linear actuator.
(Intellectual Property of Mennitti)
Originally I used 2 actuators; one on each arm of the trunk. This is overkill; one works much smoother because it does not need to compete with the other.
*Anyone who uses this tutorial but refuses to solder their connections will be doomed to installers hell when they die. Here you will be forced to install Bulldog remote car starters without a security bypass for all eternity on Impalas that reek of cigarette smoke, have leaking floor boards, remains of shattered glass under the carpets, in 20 degree weather and no Kerosene for the heater, for men who use their drivers seats as Kleenexes when they drive.
Please do not post comments. The purpose of this thread is for people to research. They are not going to want to sort through several pages to find relevant information pertaining to this installation. If you have a question about something that is unclear please email me. If need be, I will update the information to clarify.
Check out my other How Tos: Installing a Remote Car Starter, Building custom trunk panels, Motorizing your trunk lid, Adding/Relocating a battery to your trunk, Going from 9005/9006 to 9007 bulbs (converting your headlights into 2K with OEM functions), etc.
^CLICK ME TO SEE HOW I BUILT EVERYTHING^ How To in Interior Forum