In another thread in this forum, member Letxen3 authored a post about the projector headlights hed bought and asked questions about bulbs. Readers chimed in and some mentioned they had the same headlight units. I added that Id bought a set too and planned to open them up to paint them. Another member, Andrew Jackson, expressed interest in how it turned out so this is a write-up of what I did. Apologies in advance to everyone, and I know theres no new ground here as these headlights have been around for years and I dont doubt this has all been done many times before.
I originally saw a body-color projector headlight treatment on my next door neighbors teenage daughters boyfriends Ford Probe and decided to try it on my J. Of all the eBay and on-line vendors that feature these lights for the Cavaliers, there only seem to be a few housing variations and Im sure theyre all coming from the same factory in Taiwan. Before buying these, I asked a couple of the vendors if they could be disassembled, and they said (one way or another), No. I decided to try anyway as it looked like it might be possible from the pictures on their sites. On examining after receiving them, they seemed to be serviceable mold quality, but nothing to write home about. (I have some experience in plastic molding from a past life.) The plastics used are not exotic or exceptionally robust and are easily affected by solvents (ie: lacquer thinner) and abrasion.
To disassemble them, I first popped off the four spring clips (2 top, 2 bottom). The clear front lens seemed to be pressed into grey plastic sealer that had been wrapped in a circumferential groove in the reflector back. (Sort of a modified tongue in groove arrangement.) I used a hair dryer to heat the seam between the lens and housing back, starting at the inboard (pointy) end of the unit and going both directions across the top and bottom. After a couple of minutes, I was able to insert a metal putty knife in the seam at the end and carefully pry the two apart. After getting it open enough to insert my fingers, I had an assistant apply more heat and slit the sealer with a box cutter while I pried the lens and housing apart the rest of the way. (Remember that youre dealing with plastic here and dont overdo the heating or prying.) Obviously with the sealer used, the manufacturer never intended these to come apart. Thats sad (read: Cheap) as there are no replacement parts offered that I can tell and youre screwed if you pick up a rock in one of the lenses and have to buy another set. A quality unit would use a proper gasket and be rebuildable.
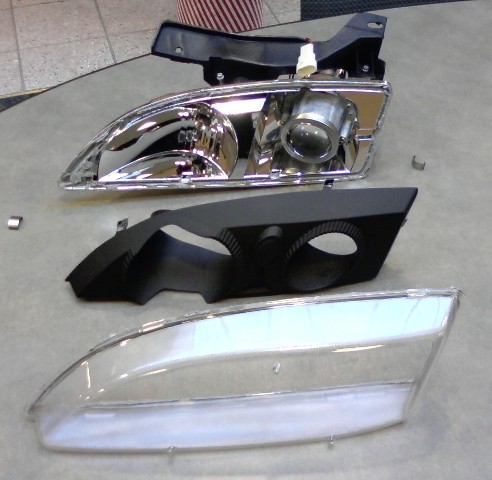
The picture below shows a unit with the parts separated. There are three basic parts, the chromed reflector housing or main back of the unit with the mounting/adjusting bracket attached, a center bezel either chromed or black (depending on what you bought), and a clear cover or lens. The bezel wasnt secured in any way other than having tabs to locate it on the reflector while being sandwiched in by the lens. The reflector is completely chromed even though only a small part is needed, looks generic enough and its likely used for other lighting configurations.
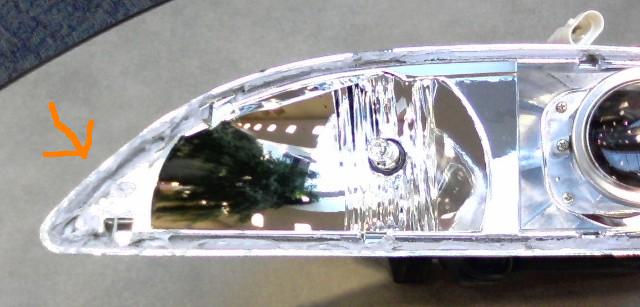
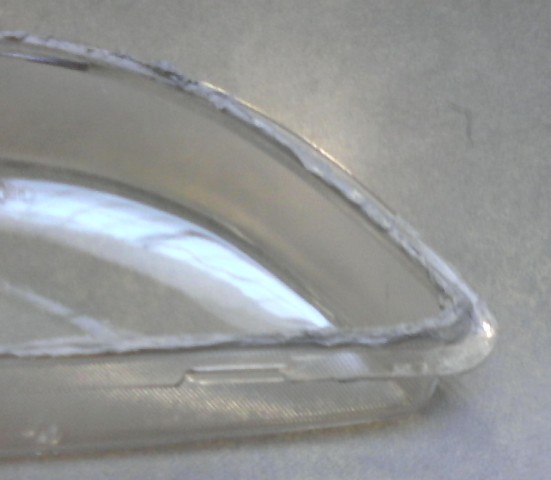
The biggest pain is the grey plastic putty sealer used to seal the cover to the reflector. Ive seen this stuff in use (mostly) for holding water dam sheet plastic inside doors and other disgusting applications. I know the inventor was probably hoping for a Nobel Prize, but I hope he receives a more sinister fate. In fairness to the manufacturer, it is cheap and quick. But in this application, its success at sealing is dependent on how well the pieces fit together, how careful the sealer is applied and how much pressure is used to squish the mess together. On my example, it wasnt done very well and Im certain the units would not have been moisture tight. Fortunately, the stuff is confined mostly to the groove in the reflector and the edges of the lens where it contacted it. But in order to get the parts back together, you really need to remove as much as possible. The next two pictures show the residue of the sealer in the groove of the reflector (orange arrow) and on the tongue of the lens.
To remove the putty sealer, I started with the reflector where most of it was located and heated a four to six inch length of the groove for a minute or so with the hair dryer. Then using a flat blade screwdriver, I scraped it out and formed a glob (for lack of any other technical term). I then heated another length of the groove, scraped more out and added it to the glob. Once Id scraped the entire groove, I was left with a sizable glob that I allowed to cool somewhat. On the second pass, I heated what was left in the groove in the reflector, but then pressed the cooler glob into the heated putty, which then stuck to it and actually came off rather well when the glob was pulled quickly away.
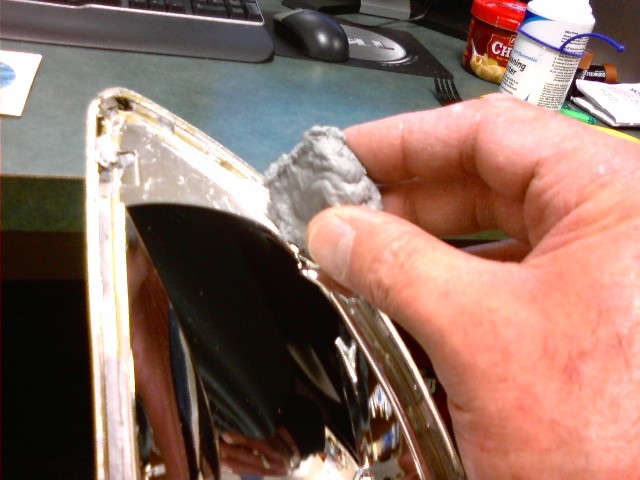
Its kind of an acquired technique, heating the remnants of the putty in the reflector groove, then sticking the glob to it and pulling it quickly off. With a little practice (actually, a lot of practice), I managed to get most of the horrible stuff off. What isnt adequately relayed here is the language I used while doing this or the amount of beer consumed to ensure completion. Ill just say, Use the same procedure on the other reflector and the two lenses as well. Fortunately, removal of every trace of the stuff isnt necessary as it wont be visible. But, you do need to get the majority of it off so the parts fit closely together again. Id thought of sourcing an address where to send the glob of sealer back to the manufacturer, but thought better of it as someone might mistake it for an explosive and Id get a visit from someone from Homeland Security. Its probably best to just throw it out.
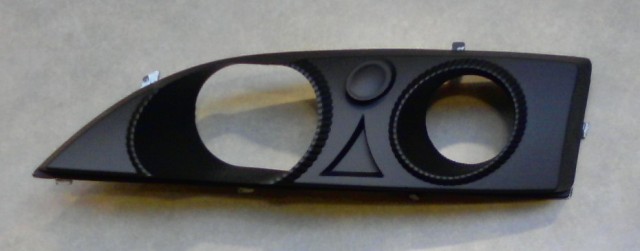
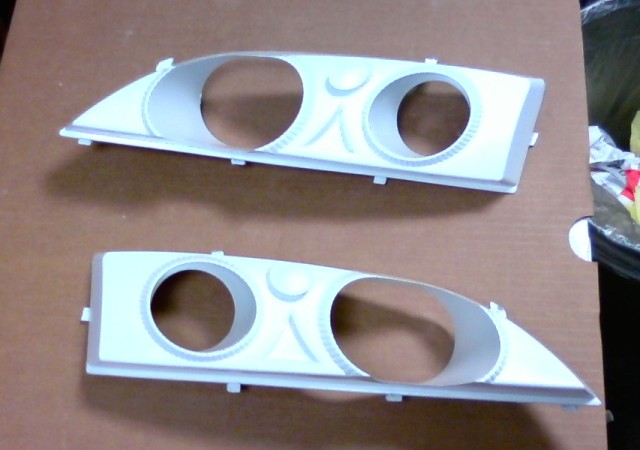
The bezel pictured above is a simple piece, but harder to paint than you might think at first glance since you have many angles and holes to spray through. Its a little over styled for my taste with oblong circles, triangles and ribs, but overall its okay and less busy than some Ive seen. I wanted it body-color, hoping to get a little of the look of the headlight treatment thats on the yellow Cavalier racer featured on the JBO home page. I also wondered whether or not the paint (regular DupliColor) would hold up to the heat generated by the bulbs. That remains to be seen, but if the plastic in close proximity can take the heat, the paint should too. If not, Ill do it over with something more durable. The next picture shows the bezels painted (white in this case).
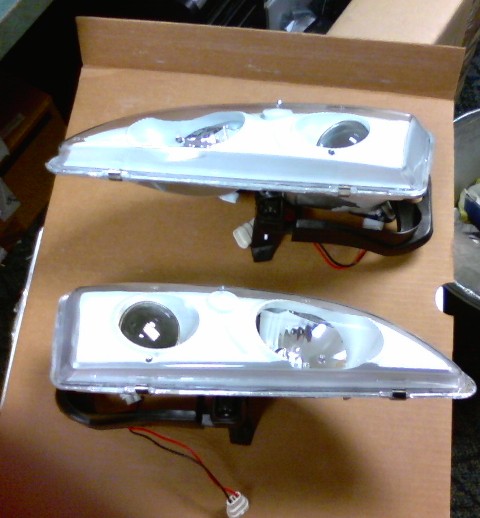
Before assembling, I test fitted the parts together and even loosened the screws holding the projector units to the reflectors to see if I could correct the alignment a bit (results mixed). Poor alignment is one of my pet peeves, as youll see later. After testing, I cleaned everything thoroughly to remove finger prints, etc. Since I wanted to be able to open these up again if I had to, I decided not to use sealer in the main groove of the reflector. Instead, I assembled the three pieces and used RTV silicone (clear) on the seam between the lens and reflector. Specifically, I applied a small bead where the metal clips go, then installed the clips, then applied more to the complete circumference of the seam. My reason for this is that I can still get them apart by cutting the silicone at the seam. If Id filled the groove and pressed everything together, Id have a heck of a time ever getting them apart again, probably much worse than with the putty sealer. And, Im confident theyre still sealed tight and I can touch them up if needed. (Lastly, the trace of the putty sealer inevitably left behind adds a remarkable amount of strength and rigidity to the assembled unit.) Here is a picture of the units assembled before installation.
After all this work, I was disappointed that the headlight units didnt fit very well in the car. The alignment with the bumper was poor, with the inboard (pointy) end up from the bumper and in (rearward) from where it needed to be. (The pictures posted by Letxen3 of his car in his thread
http://www.j-body.org/forums/read.php?f=7&i=368856&t=368856l
show he had the same alignment problems.) Though there are two adjustments possible for aiming the headlights (fore/aft and up/down), there wasnt enough travel available to bring the outboard end of the assembly back (aft) to square everything up. In examining it, I found that the rear of the reflector behind the projector unit protruded further back than the OEM headlight and it hit the body (specifically the radiator support brace) preventing the whole unit from seating correctly or being effectively adjusted. I tried first to relieve a bit of the plastic off the back of the reflector, but there wasnt enough and it didnt work. I next tried to dimple the radiator support (its in a non-visible location) to get more clearance, but that didnt work either. I considered this unacceptable as nothing says cheap better than ill fitting costume jewelry. I was close to throwing the assemblies in the garbage when cooler heads prevailed and I sat down to have a drink(s) and study the problem.
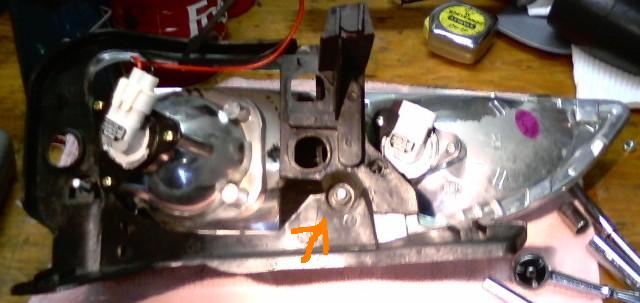
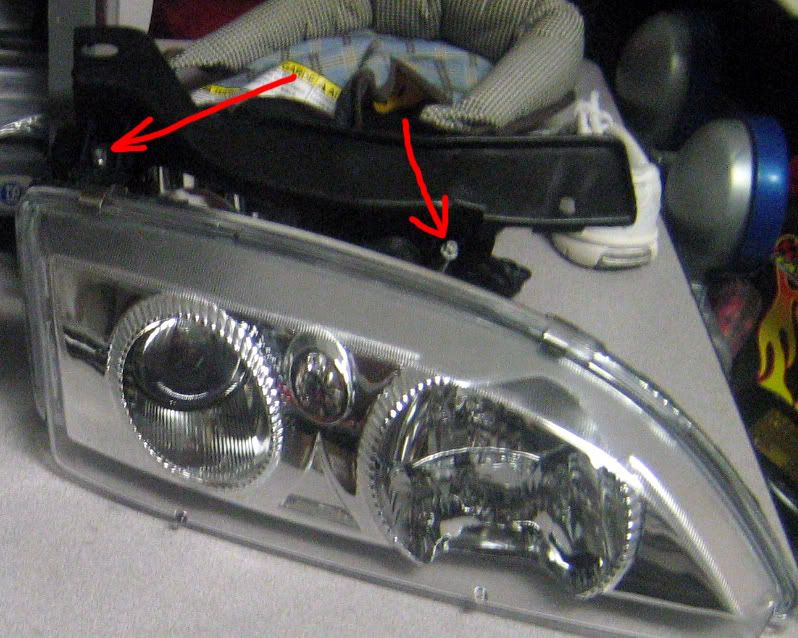
The reflector assembly is attached to the mounting/adjustment bracket. The Reflector contacts the bracket in three places, the up/down adjuster at the bottom, the fore/aft adjuster on the outboard end and the pivot point or stud near the center top. I felt that if I could somehow shim the pivot point farther out (away) from the bracket, say ¼ inch, and back out the adjusters a similar amount, then the headlight assembly would effectively move forward that same amount and Id gain a ¼ inch of clearance behind the reflector which might be enough to allow proper adjustment. So, I backed off the adjusters and removed the nut on the pivot stud (shown by the arrow in the picture below).
I then pulled the bracket (gently) off the stud, slid a (larger) nut that was ¼ inch thick onto the stud and replaced the bracket and securing nut. This effectively moved the reflector ¼ inch further away from the mounting bracket. This time when I slid the unit in place in the car, it dropped right in and I was able to adjust it square with the bumper and hood. The additional ¼ inch of clearance was sufficient. (WooHoo.) All I needed to do was duplicate it for the other side and finish the installation.
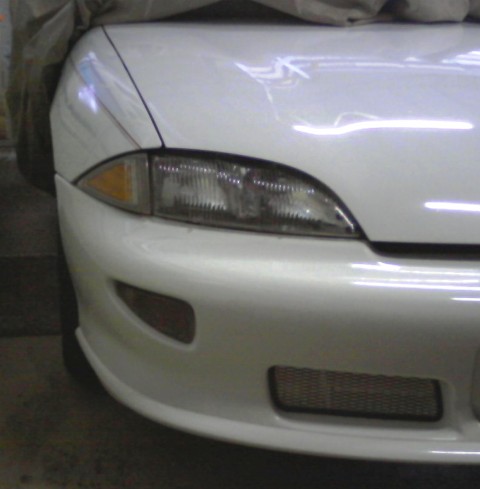
Here are a couple of pictures, first of the OEM headlight and two others of the finished projector headlight with body-color bezels.


Was it worth it? Your method may vary, but I like it as its a little custom and a bit more unique to my eyes than chrome or black. It might look better/different on cars that arent Frigidaire White, but thats what I have to work with. (I think it would look great on Letxen3s blue sedan.) Take Care and Good Luck. - Mark


 lol.
lol.
