This is an article which will and can be used for pretty much any vehicle and not just the SRT-4.
I also plan on doing this to the Cavalier and have most of the parts already for this relocation.
We strived to do this setup so that we (Kevin-owner of the SRT-4 and I) could pass inspection at any NHRA and IHRA sanctioned track. Tech inspection is a tedious affair and with reading everything we could in the NHRA, IHRA, and Sport Compact division articles, came up with a plan to do it right, add a bit of overkill, and have options so that if we need, can add a lifeline to the system if needed.
I'd give you a complete list of everything but the time to do so would entail days of going through receipts and records.
So with pictures and a little bit of text, hope to dispell any controversy with doing this battery relocation correctly.
First, here's a picture of the engine bay of the SRT-4 (or any engine bay) with the battery removed as well as the battery tray.
When doing so, only remove the hot and ground posts from the battery but keep all of the connections on those posts in tact until you start putting in your hot and ground posts. This keeps the confusion down and eases installation.
Here's the pic.

Next, here are some of the pictures of the cables we used, some parts, and if you look closely, can pretty much figure out what you'll need to do this right.

We pretty much took some 16 gauge wire to premeasure all of the lengths that we needed to do this install.
We actually run the wire through all of the places we decided to run the main power cable as if we were actually running the cable itself. Once done, took notes on the lengths that we had and also drew up a schematical diagram of the car on paper with the lengths to where we needed to go.
We also figured out where we were going to mount the hot and ground posts in the engine bay, where we were going to mount the battery box, and how we were going to route the wire on paper, and on the car itself.
Remember, everything we did was premeasured so that when we took our wire to the shop, had them professionally crimped with a hydraulic crimper.

Here, you see some more wires that we premeasured with ends already crimped.
We used 2/0 marine cable which was flexible enough to route and had enough strands to carry a good load with negligible voltage drop, period.
Btw, each and every cablle came out perfect and fit every exact location we measured. If you didn't guess already, we bought one long length of cable and cut the pieces as needed to make up the individual connection. We even marked those cables with marker to let us know ahead of time which cable went where so it'd make the install a bit easier. It helped bigtime.

Here is the car with some cardboard down for ease of getting around on the concrete.
Sliding on cardboard is a tuners best friend.


These are some pictures of the parts we used.
You can get most of these at any marine dealer or online.
BlueSea Systems parts, Lowes or Home Depot will have alot of the other parts you need including the 3/8 inch stainless bolts/ nuts, washers, and every little bit of hardware you see in the pictures.
I used 5/8 inch splitloom to cover the main run of the cable going from the old battery location to the new location in the trunk. It's also one piece so if you can get it cut by the foot, will work out better.
The Flaming River switch you will need is the 1013 model and not the 1011 model we used. You don't want to use the magneto switching circuit so just buy the 1013 model and you'll be fine.
Also buy some 4 gauge power wire for the alternator charging circuit as this will alleviate any loss of voltage for the best possible connection.
Make sure that you use a 200 amp fuse and fuse holder to hold the amount of juice that is needed to crank the car as that can be up to 200 amps when the battery could be low. You can use the ANL or ANS style fuse and can be found at most car stereo shops.
All of the ring terminals we used for most of the wiring were for 2/0 cable and 3/8 hole diameter. We kept it all 3/8 since this was the most popular sizing that we could find.
We also recommend using the aluminum battery box by Jegs because this would nullify the need to have a firewall necessary to make the setup NHRA/ IHRA legal. Groupe 24 is what we used and purchased the Kinetic 1400 battery for our cars. We opted for the Kinetic because of our sponsorship with an audio store that gave us the batteries at 10 bucks above cost. Thank you Advanced Audio.
Here we go with the actual install.

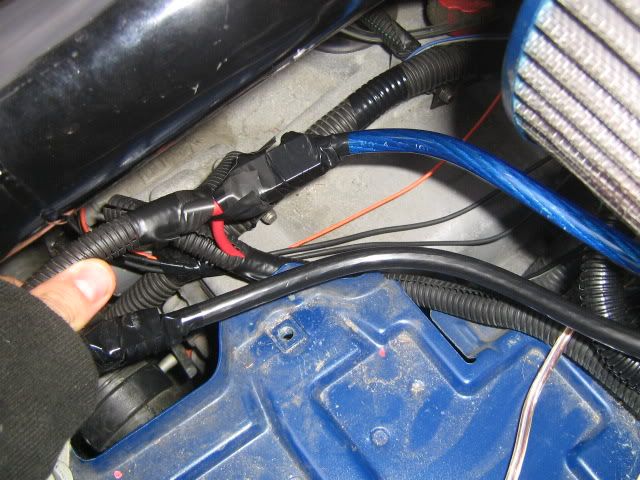
Here, we brought up the wire from under the car, behind the driverside front tire into the engine bay.
This route was the easiest to run and kept it the shortest path while being safe around the turbo and other things that could get in the way of the wire.

Above, you'll see the turbo in the top right, the main power cable, and the 4 gauge charge circuit wire which was already run through the car for the car amp that Kevin had in his car.
If you're like most, you'll already have a good size wire in the car run for your amp which is usually in the trunk. This made it easy for our charge circuit with the wire being big enough, long enough, to meet the needs or our install. One step deleted.

This is from under the car, looking up and just to the left of the center of the car going into the engine bay.

Another view of the wire going into the engine bay from beneath the car, just under the driver seat but to the right of the main chassis frame.

Last picture from below and before we added the loom to the whole run of cable. We also used the steering pump tubing to hold the cable down so it wouldn't go anywhere.

First picture of the cable from under the car, driver side and along the chassis frame of the car. You'll also see our use of the electrical straps that were 3/4 inch in size and worked out perfectly.
We also used some sheetmetal screws which were self starting and 3/4 inches long. We did predrill the holes for the screws as this made the turning of the screws so much easier than trying to start the hole with just the screw. Also remember that we had limited room to get under the car so were limited with how much room we had for drilling.

Here, the picture is upside down. lol
It's actually got the cable on the inside of the chassis with it going through the hole, going to the rocker section of the car. We kept the bends gentle and used this method so that when the car would be lifted by shops or jacks, would'nt get in the way of the jacks. Good thinking Kevin.

Looking to the rear of the car, you'll see the same cable coming from the frame rail hole to the rocker panel.
The clamps worked perfectly and the cable would not move whatsoever. Great idea with the clamps. Some of the clamps we closed in so that they would hold onto the cable a bit better and for the fact that the cable wouldn't move. We did this especially as we got closer to the rear wheel.

Find a location where you want to install your switch. This should be done before and while you're measuring the cables. You may have to remove the bumper to see where all of the support beams are and also so that you don't short out the connections on the back of the switch after it's installed. Leave enough room for the switch connections so that when the bumper is on, nothing touches.

This is where we found to be the best location for the switch. It worked out good but hindsight said we should've mounted it elsewhere so that the width of the body of the switch could be accounted for. It still works great but aesthetically could be better. Once you drill your hole, that's where you'll be mounting your switch so plan it out carefully.

Here you'll see where the wire came from under the car, was routed on the support beam, looped around to one side of the switch, and then with another precut cable, would lead into the car through the air vent on the side of the vehicle.

Here, you see to the lower left, the incoming wire in the split loom as it loops around to the farside of the switch, with the red wire on the other side of the switch leading into the car through the vents.
This is it for the first part of the install, see the second thread for more.
Misnblu.com
Newbie member since 1999
Thank you Dave and JBO!